पायथन में ऑडियो को टेक्स्ट में कैसे ट्रांसक्राइब करें: डेवलपर्स के लिए एक चरण-दर-चरण एपीआई गाइड
![यह ब्लॉग /blog पेज के शीर्ष पर प्रदर्शित किया जाएगा। एक समय में केवल एक ही ब्लॉग को प्रदर्शित किया जा सकता है। यदि कई ब्लॉग प्रदर्शित किए जाते हैं, तो सूची में केवल पहला प्रदर्शित ब्लॉग ही दिखाई देगा। Python में ऑडियो को टेक्स्ट में ट्रांसक्राइब करें, जिसमें साफ प्रीप्रोसेसिंग, API कॉल, डायराइजेशन, चंकिंग और प्रोडक्शन रीट्राय/कॉस्ट पैटर्न शामिल हैं जिन्हें आप आत्मविश्वास के साथ शिप कर सकते हैं। पेज का मेटा डेटा खाली। पायथन में ऑडियो को टेक्स्ट में कैसे ट्रांसक्राइब करें: डेवलपर्स के लिए एक चरण-दर-चरण API गाइड। Python में ऑडियो को टेक्स्ट में ट्रांसक्राइब करें, जिसमें साफ प्रीप्रोसेसिंग, API कॉल, डायराइजेशन, चंकिंग और प्रोडक्शन रीट्राय/कॉस्ट पैटर्न शामिल हैं जिन्हें आप आत्मविश्वास के साथ शिप कर सकते हैं। how-to-transcribe-audio-to-text-in-python-a-step-by-step-api-guide-for-developers smallest.ai/blog/how-to-transcribe-audio-to-text-in-python-a-step-by-step-api-guide-for-developers खाली खाली पृथ्वी भारद्वाज खाली। ऑडियो को टेक्स्ट में ट्रांसक्राइब करना तब तक एक हल की गई समस्या लगती है जब तक आप इसे शिप करने की कोशिश नहीं करते। अलग-अलग फ़ाइल प्रकार, अजीब सैंपल रेट्स, बैकग्राउंड का शोर, लहजे (accents), और कई वक्ताओं की बातचीत एक "त्वरित स्क्रिप्ट" को एक वास्तविक इंजीनियरिंग प्रयास में बदल देती है। इसके बाद "यह मेरे मशीन पर काम करता है" से लेकर Python कोड तक का व्यावहारिक रास्ता है जो विश्वसनीयता की समस्याओं के बिना वास्तविक दुनिया के ऑडियो को संभाल सकता है। यदि आप मीटिंग नोट्स, एक वॉयस-ड्रिवेन सपोर्ट बॉट, या एक ऑडियो इंडेक्सिंग पाइपलाइन बना रहे हैं, तो वही बुनियादी बातें बार-बार सामने आती हैं। आपके पास काम करने वाला Python कोड, इस बात की स्पष्ट समझ कि कौन से नॉब्स वास्तव में सटीकता को प्रभावित करते हैं, और प्रोटोटाइप से प्रोडक्शन तक का एक वास्तविक मैप होगा। ये अनुभाग क्रम में बने हैं, इसलिए आप इसे एक मेनू के बजाय एक अनुक्रम के रूप में मान सकते हैं। Python ऑडियो ट्रांसक्रिप्शन कैसे काम करता है: बुनियादी वर्कफ़्लो। कोड लिखना शुरू करने से पहले, पूर्ण ट्रांसक्रिप्शन प्रवाह को समझना मददगार होता है। एक स्पीच-टू-टेक्स्ट पाइपलाइन केवल "ऑडियो अपलोड करें और टेक्स्ट वापस पाएं" नहीं है। एक वास्तविक एप्लिकेशन में, आपको ऑडियो तैयार करना होगा, सही अनुरोध भेजना होगा, संरचित (structured) आउटपुट प्राप्त करना होगा, और उस आउटपुट को अपने उत्पाद या वर्कफ़्लो के लिए उपयोगी बनाना होगा। यहाँ मूल वर्कफ़्लो दिया गया है जिसका अधिकांश Python ऑडियो ट्रांसक्रिप्शन सिस्टम पालन करते हैं: ऑडियो फ़ाइल तैयार करें या होस्ट करें। उस ऑडियो स्रोत से शुरू करें जिसे आप ट्रांसक्राइब करना चाहते हैं। यह उपयोगकर्ता अपलोड की गई स्थानीय फ़ाइल, आपके CRM से कॉल रिकॉर्डिंग, मीटिंग रिकॉर्डिंग, पॉडकास्ट एपिसोड, या होस्ट की गई फ़ाइल URL हो सकती है। यदि फ़ाइल पहले से ही सुरक्षित रूप से होस्ट की गई है, तो आप URL सीधे ट्रांसक्रिप्शन API पर भेज सकते हैं। यदि यह स्थानीय रूप से संग्रहीत है, तो आप Python से रॉ ऑडियो फ़ाइल अपलोड कर सकते हैं। आवश्यकतानुसार ऑडियो प्रारूप को सामान्य (Normalize) करें। ऑडियो फ़ाइलें अक्सर विभिन्न प्रारूपों, बिटरेट्स, सैंपल रेट्स और चैनल लेआउट में आती हैं। उन्हें API पर भेजने से पहले, यदि आवश्यक हो तो फ़ाइल को सामान्य करें। एक सामान्य सुरक्षित प्रारूप मोनो, 16 kHz, 16-बिट WAV है, विशेष रूप से तब जब आप विभिन्न रिकॉर्डिंग्स में अनुमानित ट्रांसक्रिप्शन गुणवत्ता चाहते हैं। यह चरण असमर्थित प्रारूपों, स्टीरियो चैनल भ्रम, या शोर वाले रूपांतरणों के कारण होने वाली समस्याओं को कम करने में मदद करता है। फ़ाइल या URL को ट्रांसक्रिप्शन API पर भेजें। ऑडियो तैयार होने के बाद, आपका Python स्क्रिप्ट इसे स्पीच-टू-टेक्स्ट API पर भेजता है। एक स्थानीय फ़ाइल के लिए, इसका आम तौर पर मतलब ऑडियो बाइट्स को पढ़ना और उन्हें एक POST अनुरोध में भेजना है। होस्ट किए गए ऑडियो के लिए, आप JSON पेलोड में सार्वजनिक या हस्ताक्षरित (signed) URL भेजते हैं। दोनों मामलों में, आपके अनुरोध में प्रमाणीकरण (authentication) शामिल होना चाहिए, जो आमतौर पर एक पर्यावरण चर (environment variable) में संग्रहीत API कुंजी के माध्यम से होता है। भाषा, डायराइजेशन, टाइमस्टैम्प और फ़ॉर्मेटिंग विकल्प पास करें। अधिकांश ट्रांसक्रिप्शन API आपको यह नियंत्रित करने देते हैं कि आउटपुट कैसे जनरेट होना चाहिए। उदाहरण के लिए, आप en जैसी भाषा कोड पास कर सकते हैं, बहु-वक्ता बातचीत के लिए स्पीकर डायराइजेशन सक्षम कर सकते हैं, शब्द-स्तरीय टाइमस्टैम्प का अनुरोध कर सकते हैं, या स्वचालित भाषा पहचान की अनुमति दे सकते हैं। ये विकल्प महत्वपूर्ण हैं क्योंकि वे प्रभावित करते हैं कि अंतिम ट्रांसक्रिप्ट खोज, कैप्शन, एनालिटिक्स, QA, या डाउनस्ट्रीम ऑटोमेशन के लिए कितनी उपयोगी होगी। संरचित JSON प्राप्त करें। एक अच्छा स्पीच-टू-टेक्स्ट API केवल प्लेन टेक्स्ट ही नहीं लौटाता है। यह आमतौर पर संरचित JSON लौटाता है जिसमें पूर्ण ट्रांसक्रिप्ट, शब्द-स्तरीय समय, खोजी गई भाषा, आत्मविश्वास स्कोर (confidence scores) और डायराइजेशन सक्षम होने पर स्पीकर की जानकारी शामिल होती है। यही संरचना एक ट्रांसक्रिप्ट को एक साधारण टेक्स्ट ब्लॉक से उस डेटा में बदल देती है जिसके साथ आपका एप्लिकेशन काम कर सकता है। ट्रांसक्रिप्ट, वर्ड टाइमस्टैम्प, स्पीकर लेबल और कॉन्फिडेंस मेटाडेटा निकालें। प्रतिक्रिया प्राप्त करने के बाद, Python में JSON को पार्स करें। डिस्प्ले के लिए पूरा ट्रांसक्रिप्ट, ऑडियो या वीडियो के साथ टेक्स्ट सिंक करने के लिए वर्ड टाइमस्टैम्प, बातचीत के लिए स्पीकर लेबल और गुणवत्ता जांच के लिए कॉन्फिडेंस स्कोर निकालें। उदाहरण के लिए, कम-आत्मविश्वास वाले शब्दों को मानवीय समीक्षा के लिए फ़्लैग किया जा सकता है, इससे पहले कि ट्रांसक्रिप्ट को ग्राहक-सामना करने वाले या अनुपालन-संवेदनशील वर्कफ़्लो में धकेला जाए। ट्रांसक्रिप्ट को स्टोर या पोस्ट-प्रोसेस करें। अंत में, ट्रांसक्रिप्ट और मेटाडेटा को अपने डेटाबेस, ऑब्जेक्ट स्टोरेज, CRM, QA प्लेटफॉर्म, BI टूल या सर्च इंडेक्स में स्टोर करें। आप पोस्ट-प्रोसेसिंग चरण भी चला सकते हैं जैसे विराम चिह्न सफाई, संपादन (redaction), संक्षेपीकरण (summarization), कीवर्ड निष्कर्षण, स्पीकर फ़ॉर्मेटिंग, या विषय टैगिंग। यही वह जगह है जहाँ ट्रांसक्रिप्शन कच्चे टेक्स्ट से परे उपयोगी हो जाता है: यह खोजने योग्य कॉल आर्काइव, मीटिंग सारांश, सहायता QA, कैप्शन, अनुपालन समीक्षा, या वॉयस एनालिटिक्स को शक्ति प्रदान कर सकता है। एक साधारण Python ट्रांसक्रिप्शन वर्कफ़्लो आमतौर पर इस तरह दिखता है: 1. ऑडियो तैयार करें या होस्ट करें: audio_path = "preprocessed_audio.wav" 2. ऑडियो को ट्रांसक्रिप्शन API पर भेजें: response = transcribe_audio(audio_path) 3. संरचित फ़ील्ड निकालें: transcript = response.get("transcription", "") words = response.get("words", []) utterances = response.get("utterances", []) language = response.get("language", "unknown") 4. परिणाम संग्रहीत या पोस्ट-प्रोसेस करें: print("Transcript:", transcript) print("Detected language:", language) print("Word count:", len(words)) print("Speaker turns:", len(utterances)) यह वर्कफ़्लो वास्तविक कार्यान्वयन में जाने से पहले आपको एक स्पष्ट मानसिक मॉडल देता है। API स्तर पर वास्तव में 'ऑडियो को टेक्स्ट में ट्रांसक्राइब करें' का क्या अर्थ है? इससे पहले कि आप Python लिखें, यह स्पष्ट करने में मदद मिलती है कि जब आप "ट्रांसक्राइब" पर क्लिक करते हैं तो स्पीच-टू-टेक्स्ट API क्या कर रहा होता है। आप किसी ब्लैक बॉक्स में फ़ाइल मेल नहीं कर रहे हैं और एक पैराग्राफ वापस नहीं पा रहे हैं। सेवा आमतौर पर ऑडियो को एक ध्वनिक मॉडल (sound to phonemes), एक भाषा मॉडल (phonemes to likely words in context), और फिर एक पोस्ट-प्रोसेसिंग परत के माध्यम से चलाती है जो विराम चिह्न, कैपिटलाइजेशन और कभी-कभी स्पीकर लेबल के साथ चीजों को साफ करती है। वे परतें भी हैं जहां गुणवत्ता अंतराल तेजी से दिखाई देते हैं। एक मॉडल जो साफ, स्टूडियो अंग्रेजी पर बहुत अच्छा दिखता है, वह अक्सर कॉल-सेंटर ऑडियो, भारी पृष्ठभूमि शोर, या बातचीत जो बीच में भाषाएं बदलती हैं, पर बिखर जाता है। इसीलिए API का चुनाव उतना ही मायने रखता है जितना कि आपका Python रैपर। यदि आप अंतर्निहित यांत्रिकी के बारे में अधिक जानना चाहते हैं, तो स्पीच रिकग्निशन Python गाइड विस्तार से बताता है कि आधुनिक रिकग्निशन सिस्टम व्यवहार में कैसे व्यवहार करते हैं। एक आधुनिक स्पीच-टू-टेक्स्ट API की आंतरिक पाइपलाइन, कच्चे ऑडियो से संरचित ट्रांसक्रिप्ट तक। अपना Python वातावरण सेट करना। एक नए वर्चुअल वातावरण का उपयोग करें। ऑडियो टूलिंग डिपेंडेंसी क्लैश के लिए कुख्यात है, और पैकेजों को अलग करना आपको अपने पाइपलाइन के बजाय अपनी मशीन को डीबग करने से बचाता है। अपने वातावरण को तैयार करने के लिए इन कमांड्स को चलाएं: python -m venv stt-env # macOS / Linux source stt-env/bin/activate # Windows stt-env\Scripts\activate pip install requests python-dotenv pydub अपनी API कुंजी को कोड में डालने के बजाय `.env` फ़ाइल में रखें। यह बुनियादी स्वच्छता है, और जब आप स्थानीय परीक्षण से उत्पादन में जाते हैं तो यह कुंजी रोटेशन को दर्द रहित भी बनाता है। `.env` में `SMALLEST_API_KEY=your_api_key_here` जोड़ें, फिर नीचे दिए गए स्निपेट के साथ इसे लोड करें। SMALLEST_API_KEY=your_api_key_here from dotenv import load_dotenv load_dotenv() ऑडियो प्रीप्रोसेसिंग: वह चरण जिसे अधिकांश ट्यूटोरियल छोड़ देते हैं। बहुत सारे ट्रांसक्रिप्शन वॉकथ्रू एक प्राचीन WAV से शुरू होते हैं और नाटक करते हैं कि यह सामान्य है। ऐसा नहीं है। फ़ोन रिकॉर्डिंग अक्सर 8 kHz पर आती हैं, जो 16 kHz की उम्मीद करने वाले मॉडल के लिए एक खराब मेल है। वीडियो MP4 या MKV के रूप में दिखाई देता है जिसके अंदर ऑडियो छुपा होता है। ज़ूम निर्यात में प्रति स्पीकर अलग मोनो ट्रैक शामिल हो सकते हैं, जो यह बदलता है कि आपको मॉडल में ऑडियो कैसे फीड करना चाहिए। `pydub` बिना किसी परेशानी के अधिकांश कष्टप्रद प्रारूप कार्य को कवर करता है। यहाँ एक छोटा प्रीप्रोसेसिंग फ़ंक्शन है जो ऑडियो को उस आकार में परिवर्तित करता है जिसे अधिकांश API पसंद करते हैं: from pydub import AudioSegment def preprocess_audio(input_path: str, output_path: str) -> str: """ Convert an audio file to mono, 16 kHz, 16-bit PCM WAV. This format is commonly preferred for speech-to-text pipelines. """ audio = AudioSegment.from_file(input_path) audio = audio.set_channels(1) audio = audio.set_frame_rate(16000) audio = audio.set_sample_width(2) audio.export(output_path, format="wav") return output_path if __name__ == "__main__": preprocess_audio("input_audio.mp3", "preprocessed_audio.wav") व्यवहार में, API को कॉल करने से पहले इस सब के माध्यम से सब कुछ चलाएं। अकेले रीसैंपलिंग से बहुत फर्क पड़ सकता है, खासकर जब मूल रिकॉर्डिंग टेलीफोनी-ग्रेड की हो। जैसा कि मोज़िला के कॉमन वॉयस दस्तावेज़ में उल्लेख किया गया है, 16 kHz मोनो WAV कई ओपन-सोर्स और वाणिज्यिक स्पीच मॉडल में मानक इनपुट प्रारूप है। ट्रांसक्रिप्शन API पर भेजने से पहले ऑडियो को प्रीप्रोसेस करना सटीकता में काफी सुधार करता है। Python में अपना पहला ट्रांसक्रिप्शन API कॉल करना। एक बार जब आपके पास एक साफ ऑडियो फ़ाइल हो, तो API कॉल सीधी होती है। नीचे दिया गया उदाहरण Smallest.ai के Pulse का उपयोग करता है, जो एक स्पीच-टू-टेक्स्ट API है जिसका उद्देश्य कम-विलंबता, उच्च-सटीकता ट्रांसक्रिप्शन है, जिसमें रीयल-टाइम परिदृश्यों के लिए स्ट्रीमिंग समर्थन है। import os import requests from dotenv import load_dotenv load_dotenv() def transcribe_audio(file_path: str) -> dict: """ Send a local audio file to Smallest.ai Pulse STT and return the transcription response as JSON. """ api_key = os.getenv("SMALLEST_API_KEY") if not api_key: raise ValueError("Missing SMALLEST_API_KEY in environment variables.") url = "https://api.smallest.ai/waves/v1/pulse/get_text" params = { "language": "en", "word_timestamps": "true", "diarize": "false", } headers = { "Authorization": f"Bearer {api_key}", "Content-Type": "audio/wav", } with open(file_path, "rb") as audio_file: response = requests.post( url, headers=headers, params=params, data=audio_file, यहाँ दो विवरण दिखने से कहीं अधिक मायने रखते हैं। `raise_for_status` HTTP विफलताओं को अपवादों (exceptions) में बदल देता है, इसलिए आप त्रुटियों से स्पष्ट रूप से निपटते हैं बजाय इसके कि चुपचाप एक खाली स्ट्रिंग प्रिंट करें और इसे "पूर्ण" कहें। और word_timestamps=true आपको शब्द-स्तरीय समय देता है, जिसकी आपको उसी क्षण आवश्यकता होगी जब आपको वीडियो में टेक्स्ट सिंक करना हो, खोज हिट को हाइलाइट करना हो, या किसी भी प्रकार का उपयोगी ऑडियो इंडेक्स बनाना हो। यदि आप एक समृद्ध पाइपलाइन बना रहे हैं, तो स्पीच-टू-टेक्स्ट डेवलपर गाइड स्ट्रीमिंग और रीयल-टाइम पैटर्न पर आगे बढ़ता है। एक होस्ट किए गए ऑडियो URL को ट्रांसक्राइब करना। import os import requests from dotenv import load_dotenv load_dotenv() def transcribe_audio_url(audio_url: str) -> dict: """ Send a hosted audio URL to Smallest.ai Pulse STT and return the transcription response as JSON. """ api_key = os.getenv("SMALLEST_API_KEY") if not api_key: raise ValueError("Missing SMALLEST_API_KEY in environment variables.") url = "https://api.smallest.ai/waves/v1/pulse/get_text" params = { "language": "en", "word_timestamps": "true", "diarize": "true", } headers = { "Authorization": f"Bearer {api_key}", "Content-Type": "application/json", } payload = { "url": audio_url, } response = requests.post( url, API प्रतिक्रिया को संभालना और संरचित डेटा निकालना। एक ट्रांसक्रिप्शन प्रतिक्रिया आमतौर पर एकल ट्रांसक्रिप्ट फ़ील्ड से अधिक होती है। अच्छे API संरचना लौटाते हैं: शब्द समय, आत्मविश्वास स्कोर, खोजी गई भाषा, और कभी-कभी वक्ता मेटाडेटा। यहाँ एक विशिष्ट प्रतिक्रिया आकार और उपयोगी भागों को बाहर निकालने का एक सरल तरीका है: def parse_transcript(response: dict) -> None: """ Print the transcript, word-level timestamps, confidence scores, and detected language. """ full_text = response.get("transcription", "") print(f"Transcript: {full_text}") words = response.get("words", []) for word in words: text = word.get("word", "") start = word.get("start") end = word.get("end") confidence = word.get("confidence") start_text = f"{start:.2f}s" if isinstance(start, (int, float)) else "?" end_text = f"{end:.2f}s" if isinstance(end, (int, float)) else "?" confidence_text = ( f"{confidence:.2f}" if isinstance(confidence, (int, float)) else "?" ) print(f"[{start_text} - {end_text}] {text} (confidence: {confidence_text})") language = response.get("language", "unknown") print(f"Detected language: {language}") आत्मविश्वास स्कोर को एक रूटिंग सिग्नल के रूप में मानें, न कि सामान्य ज्ञान के रूप में। जब कोई शब्द ~0.7 से नीचे गिरता है, तो मॉडल आपको बता रहा होता है कि वह अनुमान लगा रहा है, अक्सर शोर, किसी अपरिचित संज्ञा (proper noun), या ओवरलैपिंग भाषण के कारण। उत्पादन में, कम-विश्वास वाले स्पैन डाउनस्ट्रीम सिस्टम में अनिश्चितता को लीक करने देने के बजाय मानवीय समीक्षा को ट्रिगर करने के लिए एक अच्छी जगह हैं। एक ट्रांसक्रिप्शन API प्रतिक्रिया की शारीरिक रचना: ट्रांसक्रिप्ट, शब्द-स्तरीय टाइमस्टैम्प और आत्मविश्वास स्कोर। स्पीकर डायराइजेशन: यह जानना कि किसने क्या कहा। एकल-स्पीकर ऑडियो आसान मोड है। मीटिंग, पॉडकास्ट और सपोर्ट कॉल वे जगहें हैं जहाँ चीजें दिलचस्प हो जाती हैं, क्योंकि "क्या कहा गया था" पर्याप्त नहीं है, आपको "किसने कहा" की आवश्यकता है। यह डायराइजेशन है, और आप आमतौर पर अपने अनुरोध मापदंडों में `diarize: True` के साथ इसे चालू करते हैं। जब डायराइजेशन सक्षम होता है, तो Pulse शब्द-स्तरीय और उच्चारण-स्तरीय आउटपुट में स्पीकर लेबल जोड़ता है, ताकि आप ट्रांसक्रिप्ट को एक बातचीत के रूप में फिर से बना सकें। def format_diarized_transcript(response: dict) -> str: """ Format diarized utterances into a readable speaker-by-speaker transcript. """ utterances = response.get("utterances", []) lines = [] for utterance in utterances: speaker = utterance.get("speaker", "unknown_speaker") text = utterance.get("text", "").strip() start = utterance.get("start", 0) if not text: continue lines.append(f"[{start:.1f}s] {speaker}: {text}") return "\n".join(lines) एक पेंच है: जब लोग एक-दूसरे के ऊपर बात करते हैं तो डायराइजेशन खराब हो जाता है। कॉल-सेंटर ऑडियो में, रुकावटें आम हैं, और सबसे साफ समाधान अक्सर अपस्ट्रीम होता है (जब आपके पास अलग चैनल हों, फिर ट्रांसक्राइब करें) बजाय इसके कि मॉडल से क्रॉस-टॉक को पूरी तरह से सुलझाने की उम्मीद की जाए। स्पीकर डायराइजेशन पाइपलाइन्स गाइड बहु-वक्ता रणनीतियों पर अधिक गहराई से बात करती है। लंबी ऑडियो फ़ाइलें और चंकिंग रणनीतियाँ संभालना। ट्रांसक्रिप्शन API आमतौर पर फ़ाइल आकार या अवधि पर सीमाएं लगाते हैं। भले ही आपका ऐसा न करे, एक एकल अनुरोध के माध्यम से 90 मिनट की रिकॉर्डिंग को धक्का देना मुसीबत को बुलावा देना है: एक टाइमआउट और आप वापस शून्य पर आ जाते हैं। पाइपलाइन को लचीला रखने के लिए लंबी ऑडियो को छोटे टुकड़ों में बांटना (chunking) मानक तरीका है। लंबी ऑडियो फ़ाइलों के लिए एक मजबूत चंकिंग रणनीति: `pydub` के `make_chunks` विधि का उपयोग करके ऑडियो को 30-60 सेकंड के खंडों में विभाजित करें। सीमाओं पर शब्दों को कटने से बचाने के लिए टुकड़ों के बीच 1-2 सेकंड का ओवरलैप जोड़ें। प्रत्येक टुकड़े को स्वतंत्र रूप से ट्रांसक्राइब करें और क्रम में परिणाम एकत्र करें। एक सरल स्ट्रिंग संरेखण (alignment) जांच का उपयोग करके ओवरलैप क्षेत्र में डुप्लिकेट शब्दों को हटाकर ट्रांसक्रिप्ट को मर्ज करें। मूल फ़ाइल में अपनी प्रारंभ स्थिति के अनुसार प्रत्येक टुकड़े के शब्द टाइमस्टैम्प को ऑफसेट करके वैश्विक टाइमस्टैम्प को सुरक्षित रखें। from pydub import AudioSegment def split_audio_with_overlap( input_path: str, output_dir: str, chunk_length_ms: int = 60_000, overlap_ms: int = 2_000, ) -> list[str]: """ Split long audio into overlapping chunks. Default: 60-second chunks with 2-second overlap. """ audio = AudioSegment.from_file(input_path) chunk_paths = [] start = 0 chunk_index = 0 while start < len(audio): end = min(start + chunk_length_ms, len(audio)) chunk = audio[start:end] chunk_path = f"{output_dir}/chunk_{chunk_index:04d}.wav" chunk.export(chunk_path, format="wav") chunk_paths.append(chunk_path) if end == len(audio): break start = end - overlap_ms chunk_index += 1 return chunk_paths वह ओवरलैप "ज्यादातर काम करता है" और एक ऐसे सिस्टम के बीच का अंतर है जो सीमाओं पर अनुमानित रूप से व्यवहार करता है। इसके बिना, सीमा पर आने वाले शब्द कट जाते हैं और या तो गायब हो जाते हैं या विकृत होकर वापस आते हैं। एक सेकंड का ओवरलैप मुश्किल से प्रसंस्करण लागत को बदलता है, लेकिन यह किनारे के मामलों की एक पूरी श्रेणी को समाप्त कर देता है। यदि आप लहजे, कोड-स्विचिंग, या बहुभाषी ऑडियो से निपट रहे हैं, तो बहुभाषी ऑडियो के लिए स्पीच-टू-टेक्स्ट गाइड अतिरिक्त नुकसानों को रेखांकित करता है। ओवरलैपिंग सेगमेंट के साथ लंबी ऑडियो को चंक करना स्प्लिट पॉइंट पर वर्ड-बाउंड्री त्रुटियों को रोकता है। उत्पादन विचार: त्रुटि हैंडलिंग, पुन: प्रयास (retries), और लागत नियंत्रण। लैपटॉप स्क्रिप्ट एक डेमो है; उत्पादन वह जगह है जहाँ गन्दी चीजें दिखाई देती हैं। दर सीमाएं (Rate limits) लागू होती हैं, नेटवर्क बंद हो जाते हैं, और उपयोगकर्ता उन प्रारूपों में ऑडियो अपलोड करते हैं जिनकी आपने योजना नहीं बनाई थी (या रिकॉर्डिंग जो होनी चाहिए उससे कहीं अधिक लंबी हैं)। यदि आप उन तीनों के लिए पहले से योजना बनाते हैं, तो बाकी ज्यादातर इंजीनियरिंग है। दर सीमाओं और क्षणिक विफलताओं के लिए, घातीय बैकऑफ़ (exponential backoff) का उपयोग करें। `tenacity` इसे साफ रखता है: `@retry(wait=wait_exponential(multiplier=1, min=2, max=30), stop=stop_after_attempt(5))`। उस डेकोरेटर को अपने API कॉल पर रखें और आप अपनी खुद की पुन: प्रयास स्थिति मशीन लिखे बिना अधिकांश अल्पकालिक मुद्दों से पार पा लेंगे। pip install tenacity import os import requests from dotenv import load_dotenv from tenacity import retry, stop_after_attempt, wait_exponential load_dotenv() @retry( wait=wait_exponential(multiplier=1, min=2, max=30), stop=stop_after_attempt(5), ) def transcribe_with_retries(file_path: str) -> dict: """ Transcribe audio with retries for transient API or network failures. """ api_key = os.getenv("SMALLEST_API_KEY") if not api_key: raise ValueError("Missing SMALLEST_API_KEY in environment variables.") url = "https://api.smallest.ai/waves/v1/pulse/get_text" params = { "language": "en", "word_timestamps": "true", "diarize": "false", } headers = { "Authorization": f"Bearer {api_key}", "Content-Type": "audio/wav", } with open(file_path, "rb") as audio_file: लागत उत्पादन का दूसरा आश्चर्य है। अधिकांश ट्रांसक्रिप्शन API प्रति मिनट बिल करते हैं, जिसका अर्थ है कि "बस इसे चलाएं" तेजी से महंगा हो सकता है। दो आदतें खर्च को अनुमानित रखती हैं: अपलोड करने से पहले अवधि की जांच करें (और ऐप लेयर पर अपने कैप से ऊपर की किसी भी चीज़ को अस्वीकार करें), और परिणाम कैश करें ताकि एक ही फ़ाइल को दो बार ट्रांसक्राइब न किया जाए। ऑडियो का एक कंटेंट हैश एक व्यावहारिक कैश कुंजी बनाता है। यदि आप बड़े पैमाने पर निर्माण कर रहे हैं, तो स्पीच-टू-टेक्स्ट गाइड उच्च-थ्रूपुट आर्किटेक्चर, एसिंक वर्कर्स, कतारों और उन पैटर्नों में प्रवेश करता है जो लंबे समय तक चलने वाले पाइपलाइनों को स्थिर रखते हैं। ट्रांसक्रिप्शन सटीकता के बारे में अधिकांश डेवलपर्स क्या गलत समझते हैं। एक 5% WER तब तक छोटा लगता है जब तक आप इसका अनुवाद नहीं करते: लगभग हर 20 शब्दों में से 1 गलत है। 500 शब्दों की मीटिंग सारांश में, यह लगभग 25 त्रुटियां हैं। अत्याधुनिक मॉडल भी साफ बेंचमार्क स्थितियों की तुलना में शोर वाले, सहज संवादात्मक भाषण पर सार्थक रूप से उच्च शब्द त्रुटि दर दिखाते हैं (कभी-कभी 20% से अधिक) यही कारण है कि अपने स्वयं के ऑडियो पर परीक्षण करना गैर-परक्राम्य है। इसलिए बेंचमार्क ऐसे करें जैसे आपका कोई मतलब हो। अपने API का परीक्षण उस ऑडियो पर करें जो आपके उत्पाद से मेल खाता हो, न कि साफ डेमो क्लिप पर। वास्तविक वातावरण से 10-15 मिनट कैप्चर करें, सटीकता मापें, और उसके बाद ही प्रतिबद्ध हों। डोमेन शब्दावली वह जगह है जहाँ सामान्य मॉडल सबसे अधिक लड़खड़ाते हैं, चिकित्सा शब्द, उत्पाद के नाम, आंतरिक संक्षिप्त शब्द। यदि आपका प्रदाता कस्टम शब्दावली या डोमेन अनुकूलन प्रदान करता है, तो इसका उपयोग तब करें जब विशेष शब्दावली काम का हिस्सा हो। सारांश और अगले कदम। Python में एक भरोसेमंद ऑडियो-टू-टेक्स्ट पाइपलाइन आमतौर पर चार विषयों पर निर्भर करती है: API द्वारा देखे जाने से पहले ऑडियो को सामान्य करें, प्रतिक्रिया को संरचित डेटा के रूप में मानें (एकल स्ट्रिंग नहीं), ओवरलैप के साथ लंबी रिकॉर्डिंग को चंक करें, और पुन: प्रयास और त्रुटि हैंडलिंग को प्रथम-श्रेणी की सुविधाओं के रूप में बनाएं। यहाँ दिए गए स्निपेट जानबूझकर छोटे रखे गए हैं ताकि आप उन्हें बिना दोबारा लिखे अपने खुद के स्टैक में डाल सकें। जैसे-जैसे उपयोग बढ़ेगा, आप संभवतः एसिंक प्रोसेसिंग, एक जॉब कतार और परिणामों के लिए टिकाऊ स्टोरेज जोड़ेंगे, लेकिन कोर फ्लो नहीं बदलता है। यदि आप स्पीच-टू-टेक्स्ट प्रदाताओं की तुलना कर रहे हैं, तो Smallest.ai का Pulse उन डेवलपर्स के लिए बनाया गया है जो विलंबता, ट्रांसक्रिप्शन गुणवत्ता और एक ऐसे API की परवाह करते हैं जो सफाई से एकीकृत होता है। यह स्ट्रीमिंग ट्रांसक्रिप्शन, स्पीकर डायराइजेशन, वर्ड-स्तरीय टाइमस्टैम्प और आउट ऑफ द बॉक्स बहुभाषी ऑडियो का समर्थन करता है, जो ऊपर दिए गए उत्पादन पैटर्नों के साथ संरेखित होता है। आज ही Python में ऑडियो ट्रांसक्राइब करना शुरू करने के लिए Pulse और Waves API का अन्वेषण करें। Python में उत्पादन के लिए तैयार ट्रांसक्रिप्शन पाइपलाइन के चार स्तंभ। गशवर्क टीम: इसे अनदेखा करें। Python में ऑडियो ट्रांसक्रिप्शन बनाएं। आज ही स्पीच-टू-टेक्स्ट वर्कफ़्लो का परीक्षण शुरू करें। निर्माण शुरू करें https://app.smallest.ai/ FAQ पंक्ति केवल तभी दिखाई देगी जब FAQ उत्तर सेट होगा। कृपया सुनिश्चित करें कि प्रश्न और उत्तर दोनों सेट हैं। FAQ अनुभाग की दृश्यता FAQ प्रश्न 1 के सेट होने से जुड़ी है।](https://framerusercontent.com/images/5h0IzsaRLohS5uAxf7C2xhgJnOI.png?width=1456&height=816)
क्लीन प्रीप्रोसेसिंग, API कॉल्स, डायराइजेशन, चंकिंग और प्रोडक्शन रीट्राई/कॉस्ट पैटर्न्स के साथ पायथन (Python) में ऑडियो को टेक्स्ट में ट्रांसक्राइब करें, जिसे आप पूरे आत्मविश्वास के साथ शिप कर सकते हैं।
ऑडियो को टेक्स्ट में ट्रांसक्राइब करना तब तक एक आसान और हल हो चुकी समस्या जैसा लगता है, जब तक कि आप इसे प्रोडक्शन में लागू करने की कोशिश नहीं करते। अलग-अलग फ़ाइल प्रकार, असामान्य सैंपल रेट, बैकग्राउंड नॉइज़, विभिन्न उच्चारण (एक्सेंट), और एक साथ कई लोगों का बोलना अक्सर एक "त्वरित स्क्रिप्ट" को एक जटिल इंजीनियरिंग प्रयास में बदल देते हैं। आगे जो बताया गया है, वह "यह मेरी मशीन पर काम करता है" से लेकर उस पायथन कोड तक का व्यावहारिक मार्ग है जो विश्वसनीयता से जुड़ी समस्याओं के बिना वास्तविक दुनिया के ऑडियो को संभाल सकता है।
चाहे आप मीटिंग नोट्स तैयार कर रहे हों, वॉयस-आधारित सपोर्ट बॉट बना रहे हों, या ऑडियो इंडेक्सिंग पाइपलाइन बना रहे हों, बुनियादी सिद्धांत बार-बार वही रहते हैं। अंत में आपके पास काम करने वाला पायथन कोड होगा, इस बात की स्पष्ट समझ होगी कि वास्तव में सटीकता कैसे बढ़ाई जाती है, और प्रोटोटाइप से प्रोडक्शन तक का एक यथार्थवादी रोडमैप होगा। अनुभाग क्रमवार बनाए गए हैं, इसलिए आप इसे मेनू की तरह चुनने के बजाय एक क्रम के रूप में देख सकते हैं।
पायथन ऑडियो ट्रांसक्रिप्शन कैसे काम करता है: बेसिक वर्कफ़्लो
कोड लिखना शुरू करने से पहले, पूरे ट्रांसक्रिप्शन प्रवाह को समझना मददगार होता है। स्पीच-टू-टेक्स्ट पाइपलाइन का मतलब केवल "ऑडियो अपलोड करना और टेक्स्ट वापस पाना" नहीं है। एक वास्तविक एप्लिकेशन में, आपको ऑडियो तैयार करना होता है, सही रिक्वेस्ट भेजनी होती है, स्ट्रक्चर्ड आउटपुट प्राप्त करना होता है, और उस आउटपुट को अपने उत्पाद या वर्कफ़्लो के लिए उपयोगी बनाना होता है।
यहाँ वह बुनियादी वर्कफ़्लो दिया गया है जिसका अधिकांश पायथन ऑडियो ट्रांसक्रिप्शन सिस्टम पालन करते हैं:
ऑडियो फ़ाइल तैयार या होस्ट करें
उस ऑडियो स्रोत से शुरुआत करें जिसे आप ट्रांसक्राइब करना चाहते हैं। यह यूज़र द्वारा अपलोड की गई कोई स्थानीय फ़ाइल, आपके CRM से कॉल रिकॉर्डिंग, मीटिंग रिकॉर्डिंग, पॉडकास्ट एपिसोड या होस्ट किया गया फ़ाइल URL हो सकता है। यदि फ़ाइल पहले से ही सुरक्षित रूप से होस्ट की गई है, तो आप सीधे ट्रांसक्रिप्शन API को URL भेज सकते हैं। यदि यह स्थानीय रूप से संग्रहीत है, तो आप पायथन से रॉ ऑडियो फ़ाइल अपलोड कर सकते हैं।
आवश्यकता पड़ने पर ऑडियो फ़ॉर्मेट को नॉर्मलाइज़ करें
ऑडियो फ़ाइलें अक्सर अलग-अलग फ़ॉर्मेट, बिटरेट, सैंपल रेट और चैनल लेआउट में आती हैं। API को भेजने से पहले, यदि आवश्यक हो तो फ़ाइल को नॉर्मलाइज़ करें। एक सामान्य और सुरक्षित फ़ॉर्मेट मोनो, 16 kHz, 16-बिट WAV है, विशेष रूप से तब जब आप विभिन्न रिकॉर्डिंग्स में एक समान ट्रांसक्रिप्शन गुणवत्ता चाहते हैं। यह चरण असमर्थित फ़ॉर्मेट, स्टीरियो चैनल के भ्रम, या शोरगुल वाले कन्वर्जन के कारण होने वाली समस्याओं को कम करने में मदद करता है।
फ़ाइल या URL को ट्रांसक्रिप्शन API पर भेजें
ऑडियो तैयार हो जाने के बाद, आपकी पायथन स्क्रिप्ट इसे स्पीच-टू-टेक्स्ट API पर भेजती है। स्थानीय फ़ाइल के लिए, इसका मतलब आमतौर पर ऑडियो बाइट्स को पढ़ना और उन्हें एक POST रिक्वेस्ट में भेजना होता है। होस्ट किए गए ऑडियो के लिए, आप JSON पेलोड में सार्वजनिक या हस्ताक्षरित URL भेजते हैं। दोनों मामलों में, आपकी रिक्वेस्ट में प्रमाणीकरण (ऑथेंटिकेशन) शामिल होना चाहिए, जो आमतौर पर एक पर्यावरण चर (environment variable) में संग्रहीत API कुंजी के माध्यम से होता है।
भाषा, डायराइजेशन, टाइमस्टैम्प और फ़ॉर्मेटिंग विकल्प पास करें
अधिकांश ट्रांसक्रिप्शन API आपको यह नियंत्रित करने की अनुमति देते हैं कि आउटपुट कैसे जनरेट किया जाना चाहिए। उदाहरण के लिए, आप en जैसा भाषा कोड पास कर सकते हैं, कई वक्ताओं वाली बातचीत के लिए स्पीकर डायराइजेशन सक्षम कर सकते हैं, शब्द-स्तरीय टाइमस्टैम्प का अनुरोध कर सकते हैं, या स्वचालित भाषा पहचान की अनुमति दे सकते हैं। ये विकल्प महत्वपूर्ण हैं क्योंकि ये प्रभावित करते हैं कि अंतिम ट्रांसक्रिप्ट खोज, कैप्शन, एनालिटिक्स, QA या डाउनस्ट्रीम ऑटोमेशन के लिए कितना उपयोगी होगा।
स्ट्रक्चर्ड JSON प्राप्त करें
एक अच्छा स्पीच-टू-टेक्स्ट API केवल सादा टेक्स्ट वापस नहीं करता है। यह आमतौर पर स्ट्रक्चर्ड JSON लौटाता है जिसमें पूरा ट्रांसक्रिप्ट, शब्द-स्तरीय टाइमिंग, पहचानी गई भाषा, विश्वसनीयता स्कोर (कॉन्फिडेंस स्कोर) और डायराइजेशन सक्षम होने पर स्पीकर की जानकारी शामिल होती है। यही संरचना एक ट्रांसक्रिप्ट को एक साधारण टेक्स्ट ब्लॉक से ऐसे डेटा में बदल देती है जिसके साथ आपका एप्लिकेशन काम कर सकता है।
ट्रांसक्रिप्ट, वर्ड टाइमस्टैम्प, स्पीकर लेबल और कॉन्फिडेंस मेटाडेटा निकालें
रिस्पॉन्स प्राप्त करने के बाद, पायथन में JSON को पार्स करें। डिस्प्ले के लिए पूरा ट्रांसक्रिप्ट, टेक्स्ट को ऑडियो या वीडियो के साथ सिंक करने के लिए वर्ड टाइमस्टैम्प, बातचीत के लिए स्पीकर लेबल और गुणवत्ता जांच के लिए कॉन्फिडेंस स्कोर निकालें। उदाहरण के लिए, ग्राहक-सामना करने वाले या अनुपालन-संवेदनशील (compliance-sensitive) वर्कफ़्लो में ट्रांसक्रिप्ट भेजे जाने से पहले कम विश्वसनीयता वाले शब्दों को मानव समीक्षा के लिए चिह्नित किया जा सकता है।
ट्रांसक्रिप्ट को स्टोर या पोस्ट-प्रोसेस करें
अंत में, ट्रांसक्रिप्ट और मेटाडेटा को अपने डेटाबेस, ऑब्जेक्ट स्टोरेज, CRM, QA प्लेटफ़ॉर्म, BI टूल या सर्च इंडेक्स में स्टोर करें। आप पोस्ट-प्रोसेसिंग चरण भी चला सकते हैं जैसे कि विराम चिह्न सुधार, संपादन (रेडैक्शन), सारांश, कीवर्ड निष्कर्षण, स्पीकर फ़ॉर्मेटिंग, या विषय टैगिंग। यहीं पर ट्रांसक्रिप्शन केवल कच्चे टेक्स्ट से आगे बढ़कर वास्तव में उपयोगी बन जाता है: यह खोजने योग्य कॉल आर्काइव, मीटिंग सारांश, सपोर्ट QA, कैप्शन, अनुपालन समीक्षा या वॉयस एनालिटिक्स को सशक्त बना सकता है।
एक साधारण पायथन ट्रांसक्रिप्शन वर्कफ़्लो आमतौर पर इस तरह दिखता है:
1. ऑडियो तैयार या होस्ट करें
2. ऑडियो को ट्रांसक्रिप्शन API पर भेजें
3. स्ट्रक्चर्ड फ़ील्ड निकालें
4. परिणामों को स्टोर या पोस्ट-प्रोसेस करें
यह वर्कफ़्लो वास्तविक कार्यान्वयन में जाने से पहले आपको एक स्पष्ट वैचारिक समझ प्रदान करता है।
API स्तर पर 'ऑडियो को टेक्स्ट में ट्रांसक्राइब करना' वास्तव में क्या मायने रखता है
पायथन लिखने से पहले, यह समझना मददगार होता है कि जब आप "ट्रांसक्राइब" पर क्लिक करते हैं तो स्पीच-टू-टेक्स्ट API वास्तव में क्या कर रहा होता है। आप किसी ब्लैक बॉक्स में फ़ाइल भेजकर केवल एक पैराग्राफ वापस नहीं पा रहे होते हैं। सर्विस आमतौर पर ऑडियो को एक ध्वनिक मॉडल (ध्वनि से फोनेम्स), एक भाषा मॉडल (संदर्भ में फोनेम्स से संभावित शब्द), और फिर एक पोस्ट-प्रोसेसिंग लेयर के माध्यम से चलाती है जो विराम चिह्नों, बड़े अक्षरों (कैपिटलाइज़ेशन) और कभी-कभी स्पीकर लेबल के साथ चीजों को व्यवस्थित करती है।
यही वे चरण हैं जहाँ गुणवत्ता में अंतर तेज़ी से सामने आता है। एक मॉडल जो साफ़, स्टूडियो अंग्रेज़ी पर बेहतरीन प्रदर्शन करता है, वह अक्सर कॉल-सेंटर ऑडियो, भारी बैकग्राउंड शोर, या बातचीत के बीच में भाषा बदलने पर लड़खड़ा जाता है। इसीलिए API का चुनाव उतना ही महत्वपूर्ण है जितना कि आपका पायथन रैपर। यदि आप इसके अंतर्निहित तंत्र के बारे में अधिक जानना चाहते हैं, तो स्पीच रिकॉग्निशन पायथन गाइड बताती है कि आधुनिक रिकॉग्निशन सिस्टम व्यवहार में कैसे काम करते हैं।
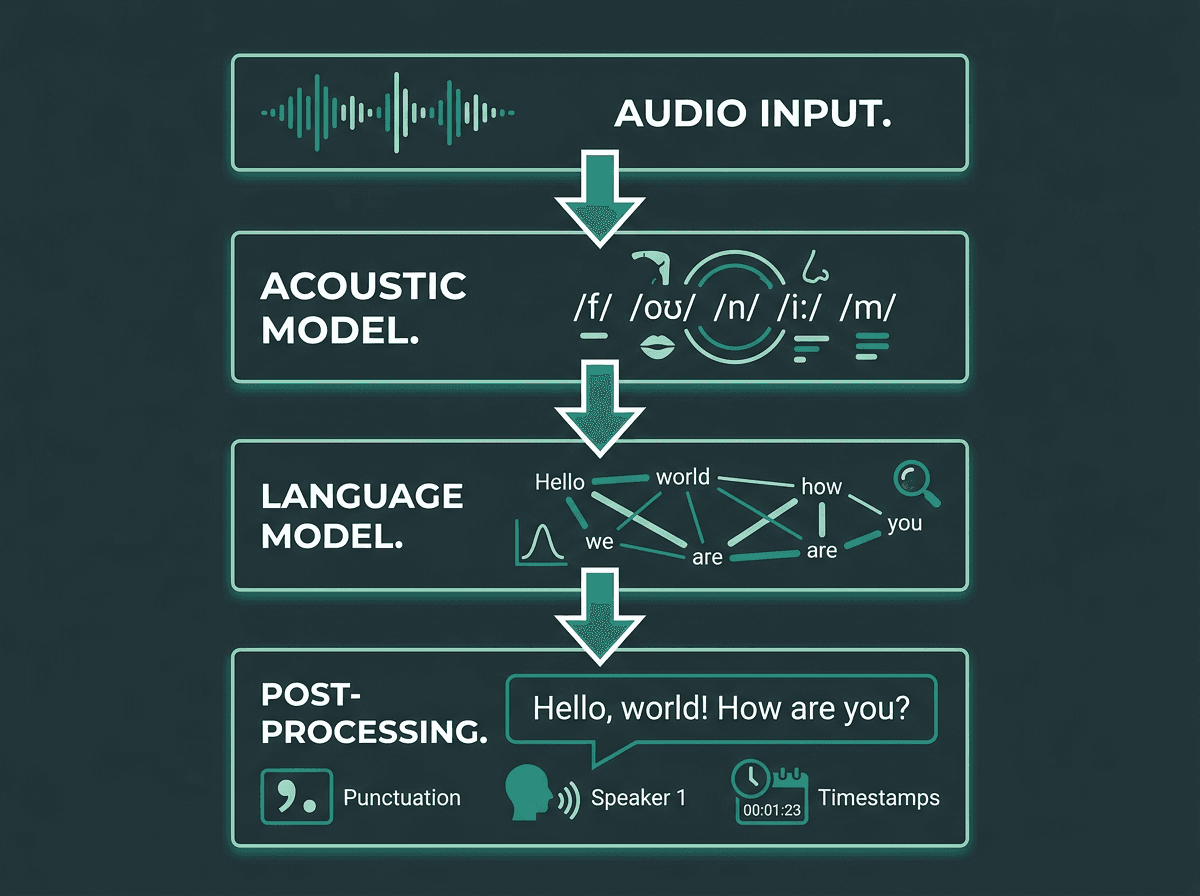
रॉ ऑडियो से लेकर स्ट्रक्चर्ड ट्रांसक्रिप्ट तक, एक आधुनिक स्पीच-टू-टेक्स्ट API की आंतरिक पाइपलाइन
अपना पायथन वातावरण सेट अप करना
एक नए वर्चुअल एनवायरनमेंट का उपयोग करें। ऑडियो टूलिंग डिपेंडेंसी टकरावों के लिए कुख्यात है, और पैकेजों को अलग रखने से आप अपनी पाइपलाइन के बजाय अपनी मशीन को डीबग करने से बच जाते हैं।
अपना वातावरण तैयार करने के लिए इन कमांड्स को चलाएँ:
अपनी API कुंजी को कोड में सीधे लिखने के बजाय `.env` फ़ाइल में रखें। यह बुनियादी सुरक्षा नियम है, और जब आप स्थानीय परीक्षण से प्रोडक्शन में जाते हैं तो यह कुंजी रोटेशन को भी आसान बनाता है। `.env` में `SMALLEST_API_KEY=your_api_key_here` जोड़ें, फिर इसे नीचे दिए गए स्निपेट के साथ लोड करें।
ऑडियो प्रीप्रोसेसिंग: वह चरण जिसे अधिकांश ट्यूटोरियल छोड़ देते हैं
कई ट्रांसक्रिप्शन ट्यूटोरियल एक बिल्कुल साफ़ WAV फ़ाइल से शुरू होते हैं और ऐसा दिखाते हैं जैसे यह सामान्य बात हो। ऐसा नहीं है। फ़ोन रिकॉर्डिंग अक्सर 8 kHz पर आती हैं, जो 16 kHz की उम्मीद करने वाले मॉडल के लिए सही नहीं होती हैं। वीडियो MP4 या MKV के रूप में आते हैं जिनमें ऑडियो एक कंटेनर के अंदर छिपा होता है। ज़ूम एक्सपोर्ट में प्रति स्पीकर अलग-अलग मोनो ट्रैक शामिल हो सकते हैं, जिससे यह बदल जाता है कि आपको मॉडल में ऑडियो कैसे इनपुट करना चाहिए।
pydub बिना किसी परेशानी के अधिकांश जटिल फ़ॉर्मेट कार्यों को संभाल लेता है। यहाँ एक छोटा प्रीप्रोसेसिंग फ़ंक्शन है जो ऑडियो को उस रूप में परिवर्तित करता है जिसे अधिकांश API पसंद करते हैं:
व्यावहारिक रूप से, API को कॉल करने से पहले सभी फ़ाइलों को इसके ज़रिए प्रोसेस करें। केवल रीसैंपलिंग ही परिणामों में काफ़ी सुधार कर सकती है, खासकर जब मूल रिकॉर्डिंग टेलीफ़ोन-ग्रेड की हो। जैसा कि Mozilla के Common Voice दस्तावेज़ में उल्लेख किया गया है, 16 kHz मोनो WAV कई ओपन-सोर्स और कमर्शियल स्पीच मॉडल में मानक इनपुट फ़ॉर्मेट है।
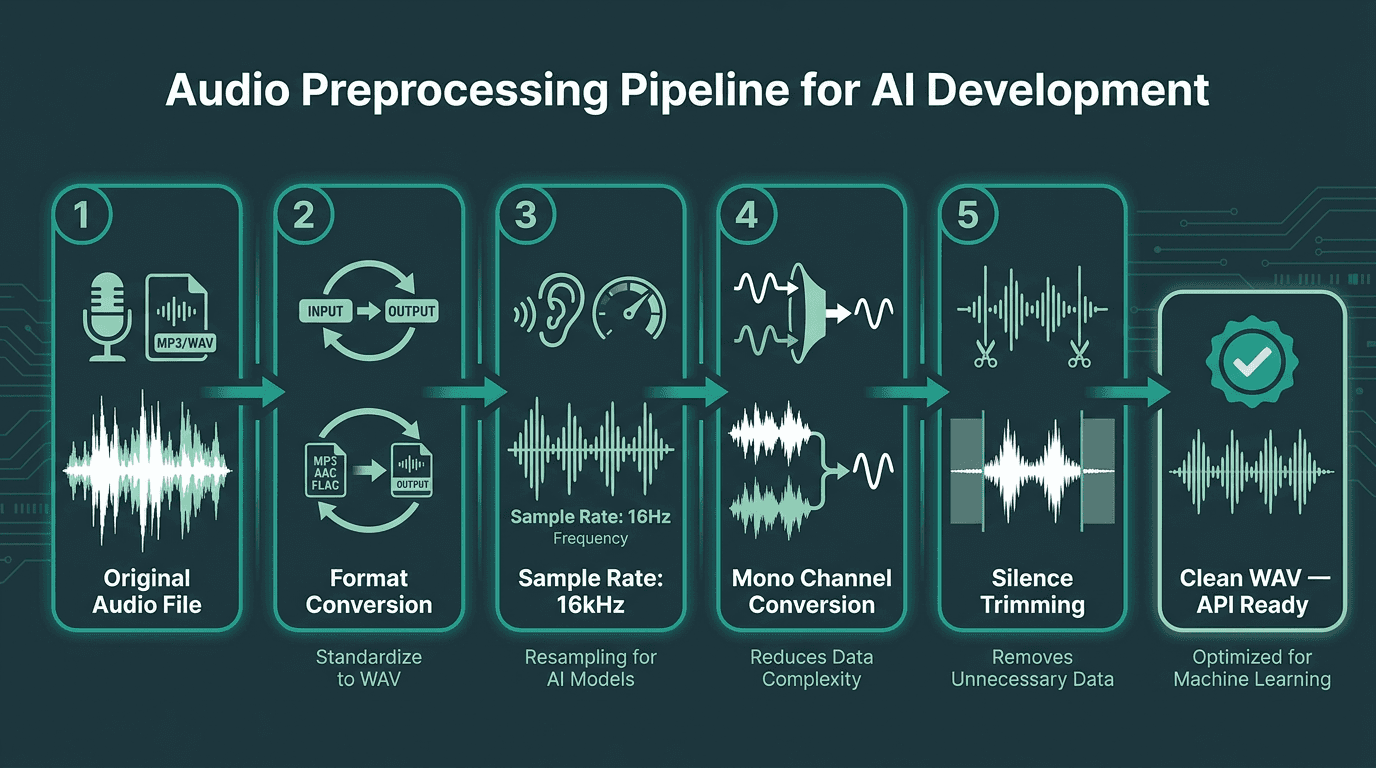
ट्रांसक्रिप्शन API को भेजने से पहले ऑडियो को प्रीप्रोसेस करने से सटीकता में काफ़ी सुधार होता है
पायथन में अपना पहला ट्रांसक्रिप्शन API कॉल करना
एक बार जब आपके पास साफ़ ऑडियो फ़ाइल हो जाए, तो API कॉल करना सीधा और आसान है। नीचे दिया गया उदाहरण Smallest.ai के Pulse का उपयोग करता है, जो कम-विलंबता (लो-लेटेंसी), उच्च-सटीकता वाले ट्रांसक्रिप्शन के उद्देश्य से बनाया गया एक स्पीच-टू-टेक्स्ट API है, जिसमें रीयल-टाइम परिदृश्यों के लिए स्ट्रीमिंग समर्थन शामिल है।
यहाँ दो विवरण दिखने से कहीं अधिक महत्वपूर्ण हैं। raise_for_status HTTP विफलताओं को अपवादों (exceptions) में बदल देता है, जिससे आप केवल एक खाली स्ट्रिंग प्रिंट करके उसे "पूर्ण" मानने के बजाय स्पष्ट रूप से त्रुटियों को संभालते हैं। और word_timestamps=true आपको शब्द-स्तरीय समय प्रदान करता है, जिसकी आपको उस समय आवश्यकता होगी जब आपको वीडियो के साथ टेक्स्ट सिंक करना हो, खोज परिणामों को हाइलाइट करना हो, या किसी भी प्रकार का उपयोगी ऑडियो इंडेक्स बनाना हो। यदि आप एक अधिक समृद्ध पाइपलाइन बना रहे हैं, तो स्पीच-टू-टेक्स्ट डेवलपर गाइड स्ट्रीमिंग और रीयल-टाइम पैटर्न पर अधिक विस्तार से चर्चा करती है।
होस्ट किए गए ऑडियो URL को ट्रांसक्राइब करना
API रिस्पॉन्स को संभालना और स्ट्रक्चर्ड डेटा निकालना
एक ट्रांसक्रिप्शन रिस्पॉन्स आमतौर पर एकल ट्रांसक्रिप्ट फ़ील्ड से कहीं अधिक होता है। अच्छे API संरचित डेटा लौटाते हैं: शब्द की टाइमिंग, विश्वसनीयता स्कोर (कॉन्फिडेंस स्कोर), पहचानी गई भाषा और कभी-कभी वक्ता का मेटाडेटा। यहाँ एक विशिष्ट रिस्पॉन्स का प्रारूप और उपयोगी भागों को निकालने का एक सरल तरीका दिया गया है:
language = response.get("language", "unknown")
print(f"Detected language: {language}")
कॉन्फिडेंस स्कोर को एक रूटिंग सिग्नल के रूप में देखें, न कि किसी मामूली जानकारी के रूप में। जब किसी शब्द का स्कोर ~0.7 से नीचे चला जाता है, तो मॉडल आपको यह बता रहा होता है कि वह अनुमान लगा रहा है, अक्सर शोर, किसी अपरिचित संज्ञा, या एक साथ बोलने के कारण। प्रोडक्शन में, अनिश्चितता को डाउनस्ट्रीम सिस्टम में जाने देने के बजाय कम कॉन्फिडेंस वाले हिस्सों के लिए मानव समीक्षा ट्रिगर करना एक अच्छा तरीका है।
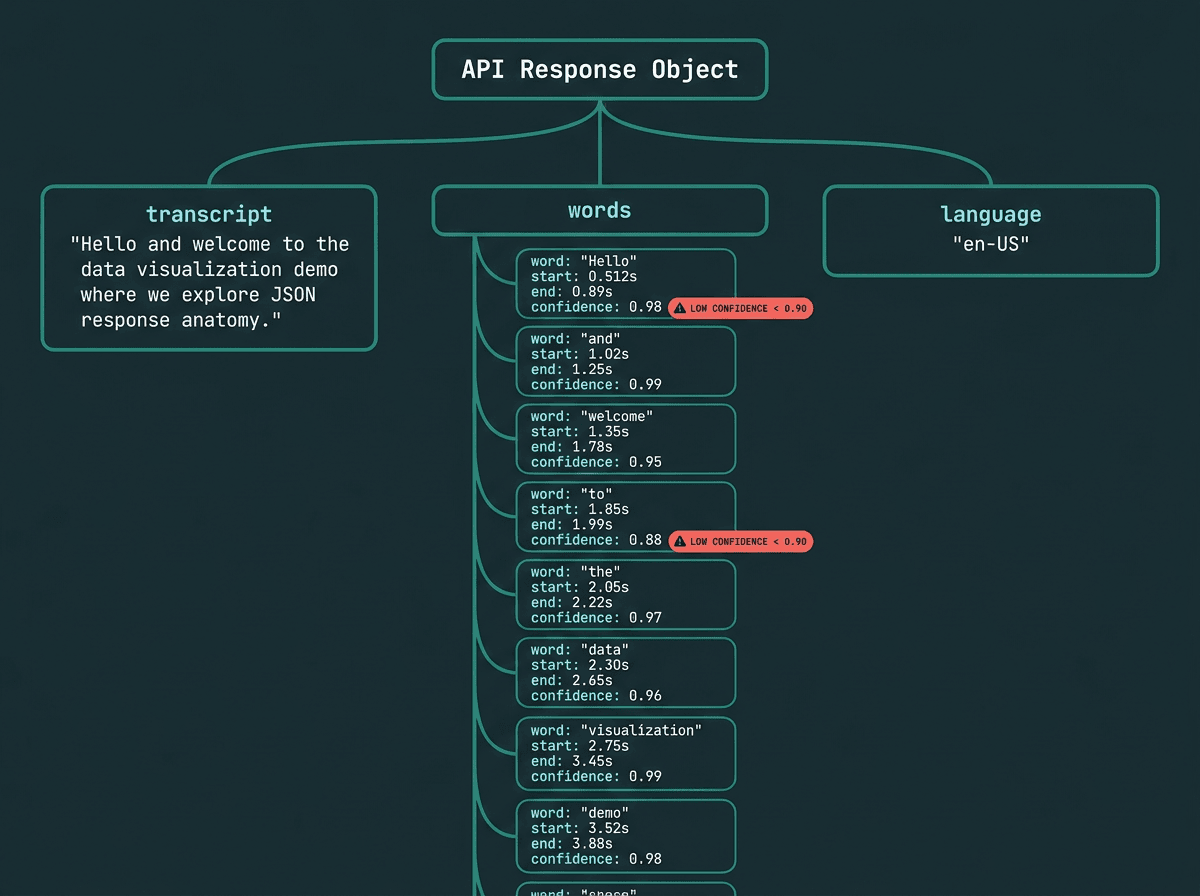
https://framerusercontent.com/images/dtDKjP7q5nU1Oh0VCEyezcE20.png%22>" data-framer-link="Link:{"url":"https://framerusercontent.com/images/dtDKjP7q5nU1Oh0VCEyezcE20.png%22>https://framerusercontent.com/images/dtDKjP7q5nU1Oh0VCEyezcE20.png%22>https://framerusercontent.com/images/dtDKjP7q5nU1Oh0VCEyezcE20.png">> dir="ltr">ट्रांसक्रिप्शन API रिस्पॉन्स की शारीरिक रचना (एनाटॉमी): ट्रांसक्रिप्ट, शब्द-स्तरीय टाइमस्टैम्प, और कॉन्फिडेंस स्कोर
स्पीकर डायराइजेशन: यह जानना कि किसने क्या कहा
एकल-वक्ता ऑडियो आसान काम है। मीटिंग्स, पॉडकास्ट और सपोर्ट कॉल्स वे जगहें हैं जहाँ चीजें दिलचस्प हो जाती हैं, क्योंकि केवल "क्या कहा गया था" पर्याप्त नहीं होता, आपको "यह किसने कहा" की भी आवश्यकता होती है। इसे ही डायराइजेशन कहते हैं, और आप आमतौर पर इसे अपने रिक्वेस्ट पैरामीटर्स में diarize: True के साथ सक्षम करते हैं।
एक पेंच यह है: जब लोग एक-दूसरे के ऊपर बोलते हैं तो डायराइजेशन की गुणवत्ता प्रभावित होती है। कॉल-सेंटर ऑडियो में, बीच में टोकना आम बात है, और सबसे साफ़ समाधान अक्सर अपस्ट्रीम होता है (जब आपके पास हों तो अलग चैनल रखें, फिर ट्रांसक्राइब करें) बजाय इसके कि मॉडल से ओवरलैपिंग बातचीत को पूरी तरह से सुलझाने की उम्मीद की जाए। स्पीकर डायराइजेशन पाइपलाइन्स गाइड बहु-वक्ता रणनीतियों पर अधिक गहराई से जानकारी देती है।
लंबी ऑडियो फ़ाइलों को संभालना और चंकिंग रणनीतियाँ
ट्रांसक्रिप्शन API आमतौर पर फ़ाइल आकार या अवधि पर सीमाएं लगाते हैं। भले ही आपके API में ऐसी सीमा न हो, एक ही रिक्वेस्ट के माध्यम से 90 मिनट की रिकॉर्डिंग भेजना जोखिम भरा होता है: एक टाइमआउट और आप वापस शून्य पर आ जाते हैं। लंबी ऑडियो फ़ाइलों को छोटे टुकड़ों (चंक) में विभाजित करना पाइपलाइन को लचीला बनाए रखने का मानक तरीका है।
लंबी ऑडियो फ़ाइलों के लिए एक मज़बूत चंकिंग रणनीति:
pydubकीmake_chunksविधि का उपयोग करके ऑडियो को 30-60 सेकंड के सेगमेंट में विभाजित करेंकिनारों पर शब्दों को कटने से बचाने के लिए चंक्स के बीच 1-2 सेकंड का ओवरलैप जोड़ें
प्रत्येक चंक को स्वतंत्र रूप से ट्रांसक्राइब करें और परिणामों को क्रमवार एकत्रित करें
एक साधारण स्ट्रिंग अलाइनमेंट जांच का उपयोग करके ओवरलैप क्षेत्र में डुप्लिकेट शब्दों को हटाकर ट्रांसक्रिप्ट्स को मर्ज करें
मूल फ़ाइल में प्रत्येक चंक की शुरुआत स्थिति से उसके शब्द टाइमस्टैम्प को ऑफ़सेट करके वैश्विक टाइमस्टैम्प सुरक्षित रखें
अक्सर पूछे जाने वाले प्रश्न
मैं पायथन (Python) से स्पीच-टू-टेक्स्ट API में कौन से ऑडियो फॉर्मेट भेज सकता हूँ?
फ़ाइल अपलोड करने के बजाय मैं रीयल-टाइम ट्रांसक्रिप्शन (वास्तविक समय में ट्रांसक्रिप्शन) कैसे करूँ?
उत्पादन (production) के लिए मुझे किस वर्ड एरर रेट (Word Error Rate) को लक्षित करना चाहिए?
डोमेन-विशिष्ट शब्दों के लिए मैं सटीकता में कैसे सुधार करूँ?
मैं बहुत सारे ऑडियो को ट्रांसक्राइब करने की लागत को कैसे कम कर सकता हूँ?