How to Run OpenAI Whisper (CLI & Python): Timestamps, Formats, and Troubleshooting


Learn how to run OpenAI Whisper via CLI and Python, handle timestamps, export formats, and fix common transcription issues.
OpenAI Whisper has become one of the more popular open-source speech recognition tools available. It was trained on 680,000 hours of multilingual audio, and honestly, the results can be pretty solid for a free model. That said, if you're evaluating it for transcription, subtitle generation, or voice-powered apps, it helps to understand both what it does well and where it falls short. This tutorial walks you through using Whisper via the command line and Python, with practical examples you can copy and run, so you can judge for yourself whether it fits your needs.
We'll cover the full process: setting up your environment, installing Whisper, running transcriptions, working with output formats, and fixing the issues that tend to trip people up (like dodgy timestamps). Here's the rough roadmap:
Step 1: Set Up Your Environment. Get Python, pip, and FFmpeg installed and ready.
Step 2: Install OpenAI Whisper. Pull the library from its official repo using pip.
Step 3: Transcribe Audio Using the CLI. Run the basic command and explore options for language and model selection.
Step 4: Transcribe Audio Using Python. Write a short script that gives you more programmatic control over the output.
Step 5: Handle Timestamps and Output Formats. Generate and interpret timestamps, and export to SRT, VTT, and other formats.
Step 6: Troubleshoot Common Challenges. Deal with memory errors, slow performance, and timestamp drift.
Prerequisites: What You'll Need
Before jumping in, make sure you have these tools ready. Getting the setup right upfront saves you a lot of headaches later.
Python 3.8+: Whisper is a Python package, so you'll need Python installed. Check your version with `python --version`. If it's not there, grab the latest from the official Python website.
Pip: The Python package installer. It usually comes bundled with Python, and you'll use it to install Whisper and its dependencies.
FFmpeg: This one catches people off guard. Whisper relies on FFmpeg to read and convert audio files, so it needs to be installed separately. On macOS, run `brew install ffmpeg`. On Windows, use `choco install ffmpeg`. On Debian/Ubuntu, it's `sudo apt update && sudo apt install ffmpeg`.
Basic Command-Line Knowledge: You should be comfortable opening a terminal, navigating directories, and running commands.
(Optional) GPU with CUDA: If you want fast transcription, especially with the larger models, an NVIDIA GPU with CUDA support makes a huge difference. CPU-only mode works, but it's noticeably slower.
Step 1: Set Up Your Python Environment
Using a virtual environment is one of those things that feels like overkill until it saves you from a dependency conflict. It keeps your Whisper installation isolated from everything else on your system. Open your terminal, navigate to your project folder, and run:
# For macOS / Linux python3 -m venv whisper-env source whisper-env/bin/activate# For Windows python -m venv whisper-env whisper-env\Scripts\activate
You'll know it worked when your terminal prompt shows `(whisper-env)` at the beginning. From here on, anything you install with pip stays inside this environment.
Step 2: Install OpenAI Whisper
With your virtual environment active, install Whisper straight from the official OpenAI GitHub repository. This pulls in all the dependencies, including PyTorch.
pip install git+https://github.com/openai/whisper.git
If you have an NVIDIA GPU, it's worth making sure you've got a CUDA-compatible version of PyTorch. Head over to the PyTorch website and follow the install instructions for your specific setup. If you skip this step, the command above will default to a CPU-only build, which still works but won't give you the speed benefits.
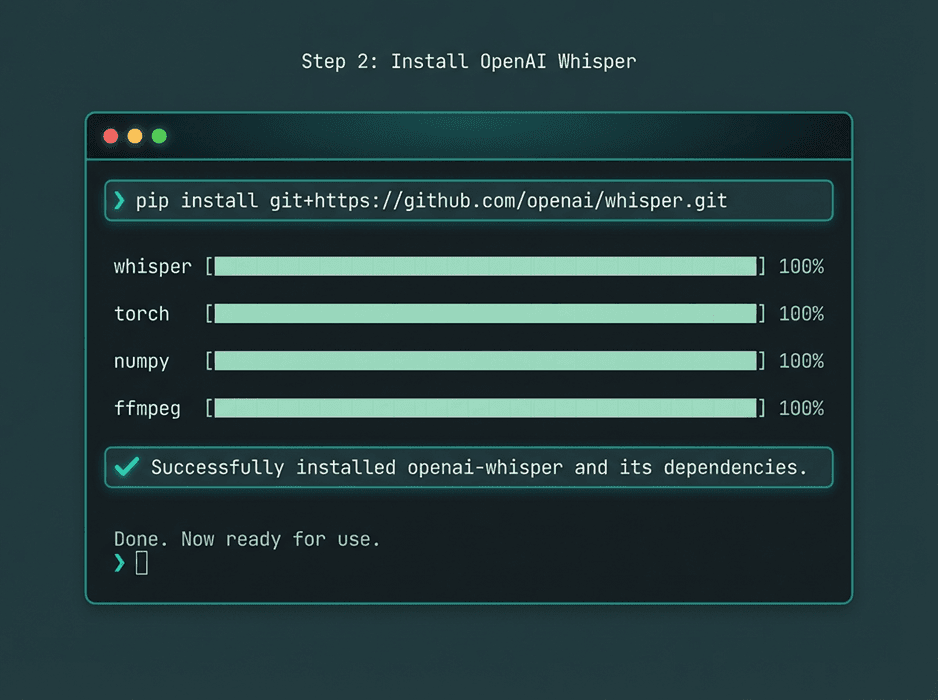
A successful pip installation will download and set up Whisper and its required libraries.
Step 3: Transcribe Audio Using the CLI
The CLI is the fastest way to get a transcription. The syntax is dead simple: `whisper <audio_file>`. Say you've got a file called `interview.mp3` sitting in your current directory:
whisper interview.mp3
The first time you run this, Whisper downloads the `small` model automatically (it's a decent middle ground between speed and accuracy). It processes the audio, prints the transcription to your terminal, and generates a handful of output files: `interview.json`, `interview.srt`, `interview.tsv`, `interview.txt`, and `interview.vtt`.
There are several flags you'll probably want to know about:
`--model <model_name>`: Pick a different model. They range from `tiny` (fast but rough) to `large` (slow but very accurate). Example: `whisper interview.mp3 --model medium`.
`--language <language_code>`: Tell Whisper what language the audio is in. If you know it's English, pass `en`. Spanish? `es`. This tends to improve accuracy. Example: `whisper audio_es.wav --language Spanish`.
`--output_dir <path>`: Save output files somewhere specific instead of the current directory. Example: `whisper interview.mp3 --output_dir transcripts`.
`--task <transcribe|translate>`: By default, Whisper transcribes. Set this to `translate` and it'll translate non-English audio into English.
Step 4: Transcribe Audio Using Python
If you need more control, or you're building Whisper into a larger application, Python is the better route. You get direct access to the transcription data, which makes it easy to do whatever you want with the output. Here's a basic script:
import whisper# Load the desired model # Model options: tiny, base, small, medium, large model = whisper.load_model("base")# Load the audio file and transcribe # The transcribe function can take the file path directly result = model.transcribe("interview.mp3")# Print the full transcription text print(result["text"])# You can also access segments with timestamps for segment in result["segments"]:start_time = segment['start']end_time = segment['end']text = segment['text']print(f"[{start_time:.2f}s -> {end_time:.2f}s] {text}")
Save that as `transcribe.py` and run it with `python transcribe.py`. The `result` object is a dictionary with the full text, detected language, and a list of segments. Each segment includes its own text, start time, end time, and other metadata. This structured output is exactly what you need if you're building something that syncs text with audio playback.
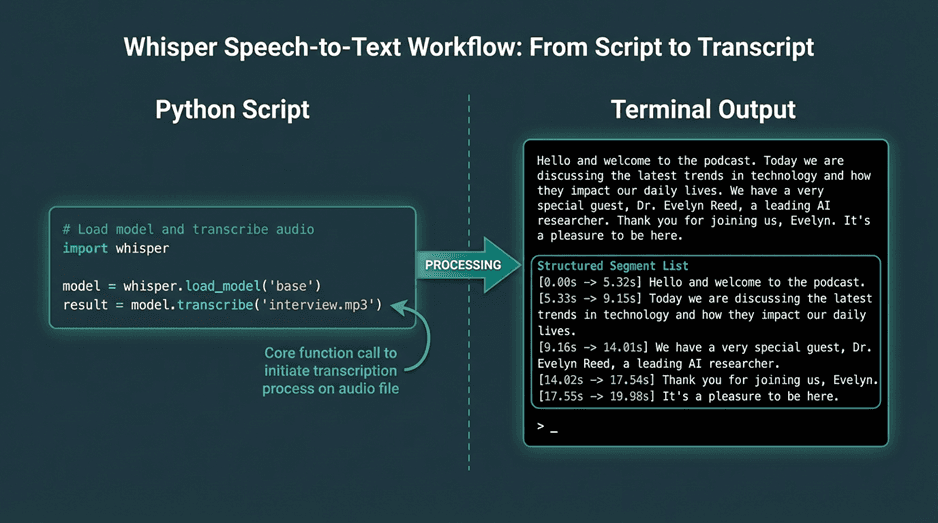
Using Whisper in Python provides access to structured data, including text segments and timestamps.
Step 5: Handle Timestamps and Output Formats
Timestamps are one of the most useful things Whisper gives you. As you saw in the Python example, the output comes segmented with start and end times. These are utterance-level timestamps, so they mark phrases or sentences rather than individual words. That's fine for most use cases, but the precision can be a bit off sometimes (more on that in the troubleshooting section below).
When you use the CLI, Whisper generates standard subtitle and caption files automatically. These are the formats you'll see:
Common Output Formats:
`.txt`: Plain text. Just the words, nothing else.
`.srt` (SubRip Subtitle): The most widely supported subtitle format. Each entry has a number, a time range, and the text.
`.vtt` (WebVTT): Similar to SRT but designed for the web. Supports more styling and metadata options.
`.json`: All the raw output data in a structured format. Segments, timings, metadata. This is the one to use if you're processing the output programmatically.
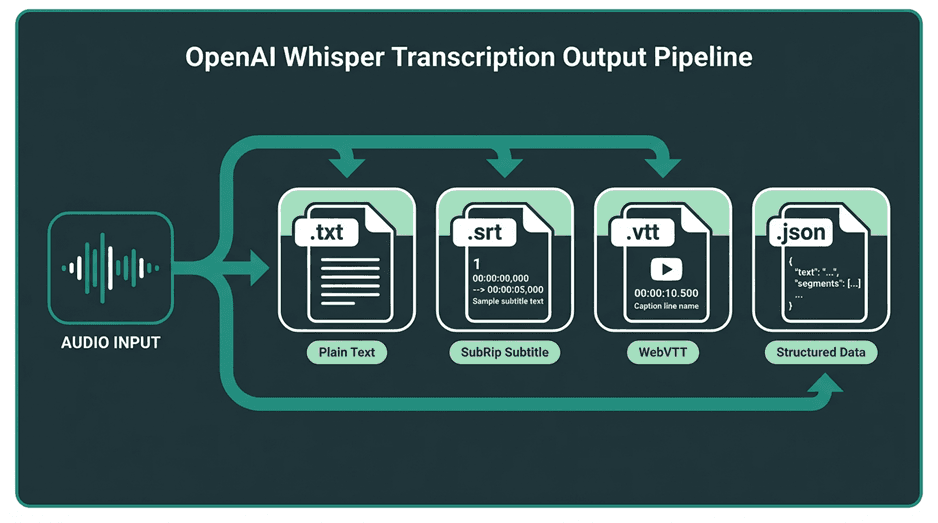
Whisper's CLI can automatically export transcriptions into multiple standard formats.
Step 6: Troubleshoot Common Challenges
Whisper is solid, but it's not without its quirks. Here are the issues that come up most often and how to deal with them.
1. Slow Transcription Speed
Nine times out of ten, slow transcription means you're running on a CPU. The transformer architecture behind Whisper is heavy, and it really wants a GPU. If speed matters to you, an NVIDIA GPU is the single biggest improvement you can make. No GPU? Use a smaller model like `tiny` or `base`. You'll trade some accuracy, but the speed difference is dramatic.
tiny | 39 M | ~32x | Fast, low-resource transcription where accuracy is not critical. |
base | 74 M | ~16x | Good balance for CPU-based applications. |
small | 244 M | ~6x | Default model; solid performance for general use. |
medium | 769 M | ~2x | High accuracy, requires a good GPU for reasonable speed. |
large | 1550 M | 1x (baseline) | Highest accuracy, for research and production systems with powerful hardware. |
2. Memory Errors (Out of Memory)
The `medium` and `large` models are hungry. They need a lot of VRAM (GPU) or RAM (CPU), and if your hardware can't keep up, you'll hit an "out of memory" error. The fix is straightforward: drop down to a smaller model, or if you're working with very long audio files, break them into shorter chunks in your Python script before feeding them to Whisper. That helps keep memory usage under control.
3. Inaccurate Timestamps
This is probably the most common complaint. Whisper's timestamps are utterance-level, and they're not always precise enough for things like karaoke-style captions or tight word-level sync. Sometimes the model places a timestamp at the end of a pause rather than the start of speech. If you need better precision, look into WhisperX. It uses forced alignment to take Whisper's transcription and the original audio, then pinpoints the exact start and end time of each word. It's a significant improvement for applications where timing really matters.
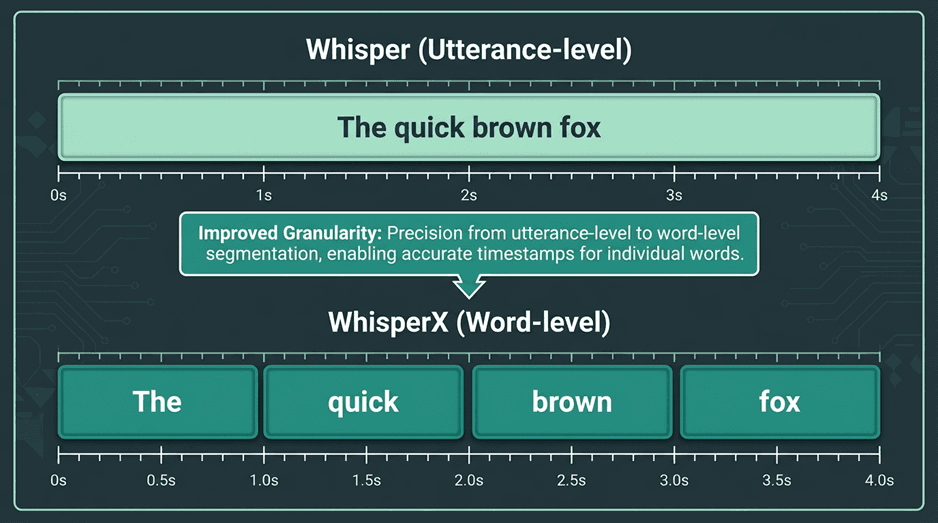
Tools like WhisperX can be used to achieve more precise word-level timestamps.
Common Challenges in Production Environments
Running Whisper locally is great for experimentation and smaller projects, but production is a different story. Self-hosting means you're on the hook for GPU infrastructure, scaling to handle multiple concurrent requests, and keeping everything running reliably. The costs add up fast, both in hardware and engineering time. And if you need real-time transcription, the latency of larger Whisper models can be a real problem since they were designed for batch processing, not streaming.
This is where managed solutions start to make a lot of sense. At Smallest.ai, we've built our speech models specifically to handle these production challenges: low latency, high throughput, and the kind of reliability you need for real-time applications like building efficient AI voice bots. We take care of the infrastructure so you can integrate speech-to-text through a simple API call without thinking about GPU provisioning or model optimization. Open-source Whisper is fantastic for many use cases, but when you need to scale with low latency, a specialized service is often the more practical and cost-effective choice.
Managed services abstract away the complexities of scaling and maintaining ASR infrastructure.
Wrapping Up and Where to Go Next
At this point, you've got everything you need to run OpenAI Whisper for speech recognition. We covered environment setup, installation, transcription via CLI and Python, output formats, and the most common issues you'll run into. That's a solid foundation for tackling all kinds of audio transcription work.
Once you're comfortable with the basics, there's plenty more to explore. You could plug Whisper into a larger application, experiment with fine-tuning on a custom dataset for specialized vocabulary, or dig into voice bot architecture to see how transcription fits into a bigger system. Voice AI is a space with a lot of room to build interesting things, and getting hands-on with Whisper is a strong starting point. For more guides and insights, check out our blog.

