Speaker Labels in Transcription: Formats, Examples and Mistakes
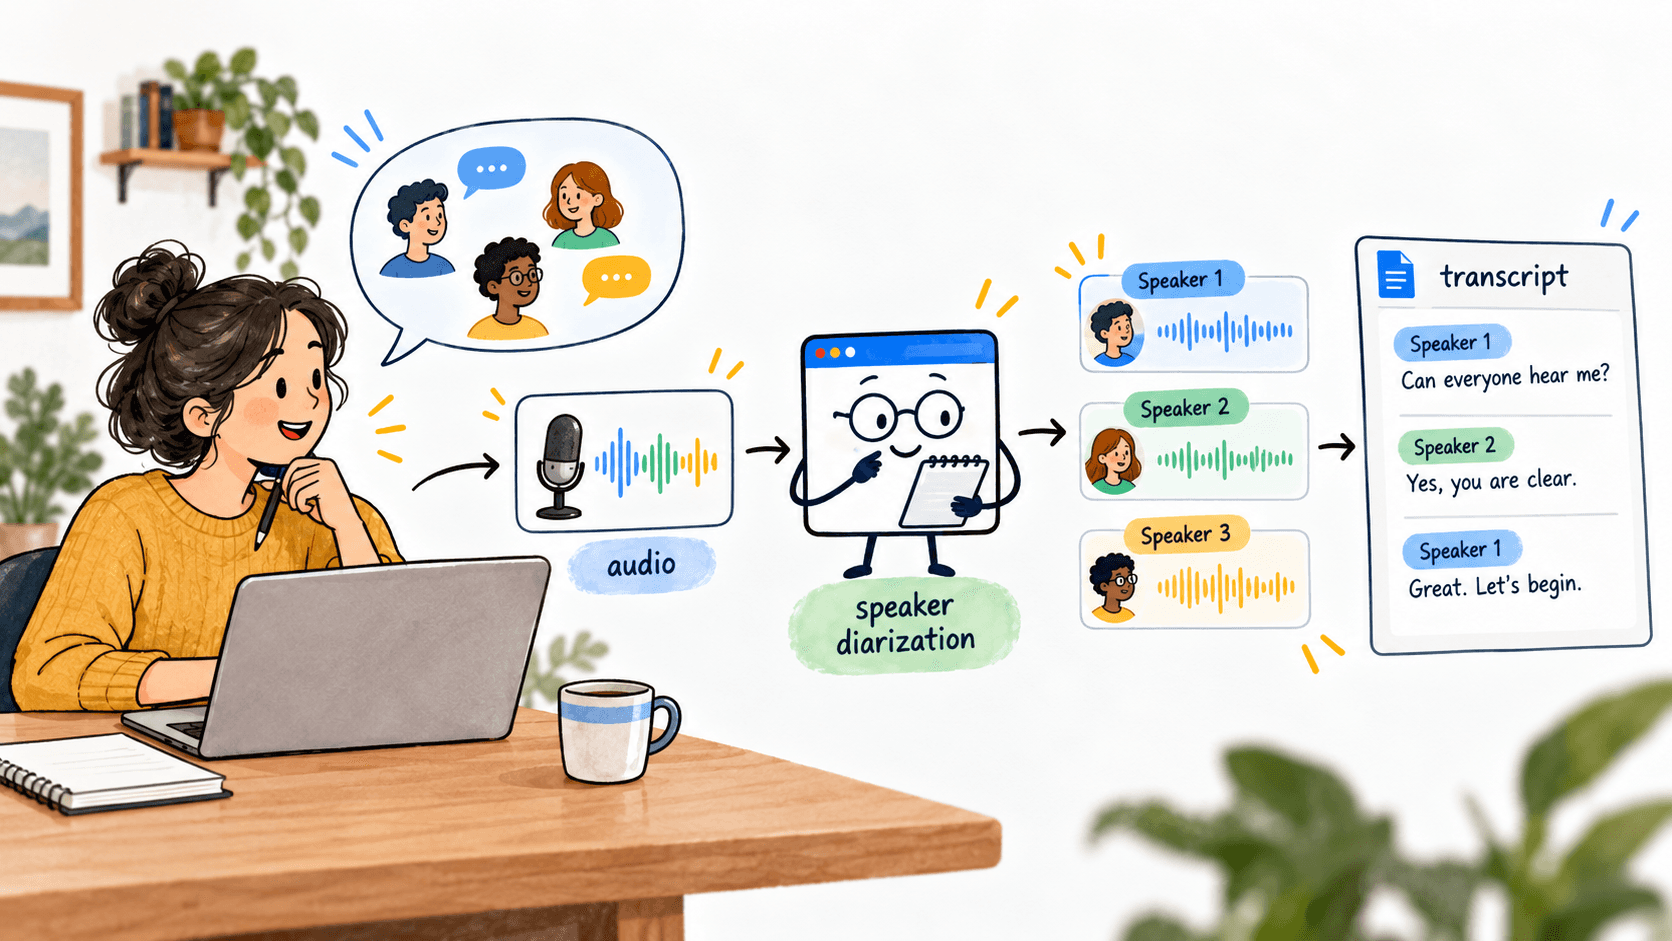
Learn speaker label formats with practical transcription examples. Discover how to identify speakers consistently and avoid common labeling mistakes.
Speaker labels are the name tags of a transcript. They tell you who said what, where one voice ends, and where another begins. The labels themselves are simple. Choosing and applying them consistently is where the real work starts.
Imagine reading a conversation with all the quotation marks removed. You can still see the words, but you have to keep stopping to work out who is talking.
That is what a multi-speaker transcript feels like without speaker labels.
A speaker label is a short identifier placed before a person's speech. It might be a generic label such as Speaker 1, a role such as Interviewer, or a person's name. The goal is not to make the transcript look formal. The goal is to make the conversation easy to follow.
That sounds straightforward. But a transcript can become confusing very quickly when labels change halfway through, when a speaker is assigned the wrong identity, or when the labeling format does not match the use case.
So let's look at what speaker labels are, the common formats, when each format works, and the mistakes that make a transcript harder to read.
What is a speaker label?
A speaker label marks the start of a speaker's turn in a transcript. Think of it as a small name tag attached to each block of speech.
Speaker 1: Can everyone hear me? |
Without those labels, the same words would still exist. What disappears is the structure of the conversation.
This matters most when more than one person is speaking. In a one-person voice note, the speaker is obvious. In a podcast, meeting, interview, customer-support call, or legal deposition, knowing who said each line can be just as important as knowing what was said.
Speaker labels and speaker diarization are related, but not identical

In automated transcription, a system may first separate the audio into different voices. This process is commonly called speaker diarization. A transcript can then attach labels such as Speaker 1 and Speaker 2 to those voice segments.
Diarization answers a structural question: which portions of the audio appear to come from the same speaker? The label answers a presentation question: how should that speaker be identified in the transcript?
That distinction becomes useful later. A system may correctly detect two different voices while still giving them generic labels. Human review can then replace those generic labels with names or roles when the identities are known. Speaker labels identify voices in recordings; a voice library instead helps select a synthetic voice for generated audio.
The main speaker label formats
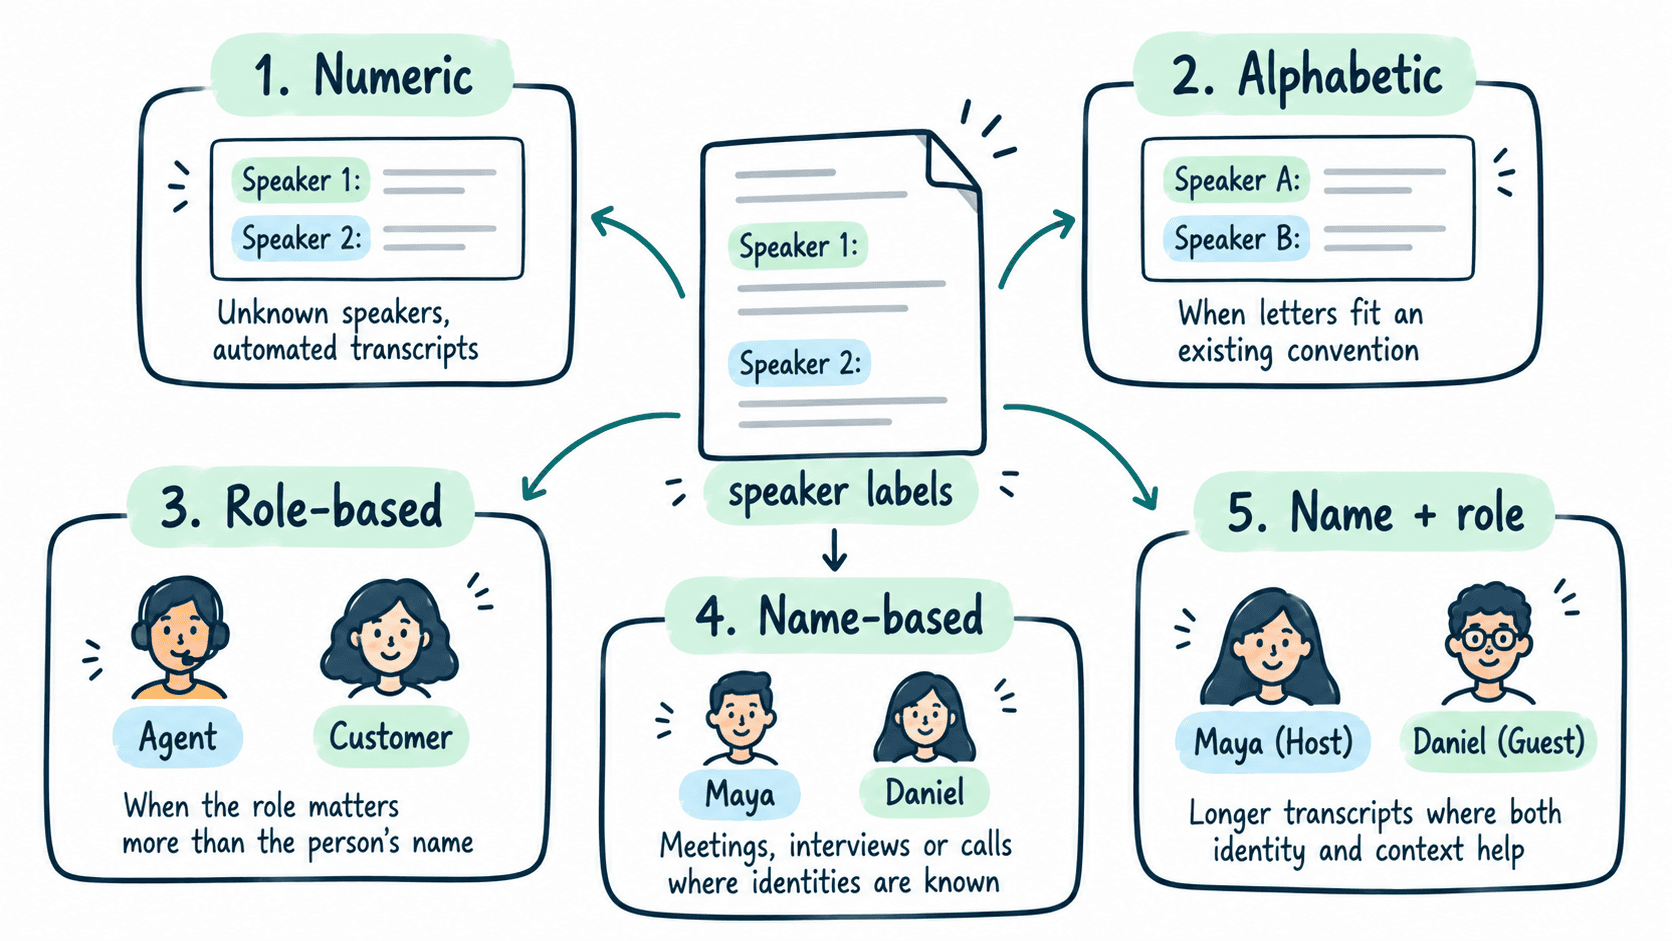
There is no single label format that fits every transcript. The useful question is not “Which label is correct?” It is “Which label gives the reader enough context without adding unnecessary complexity?”
Format | Example | Best fit |
|---|---|---|
Generic numeric | Speaker 1, Speaker 2 | Unknown speakers, automated transcripts, first-pass review |
Generic alphabetic | Speaker A, Speaker B | When letters fit an existing editorial or legal convention |
Role-based | Host, Guest, Agent, Customer | When the role matters more than the person's name |
Name-based | Maya, Daniel | Meetings, interviews, podcasts, or calls where identities are known |
Name + role | Maya (Host), Daniel (Guest) | Longer transcripts where both identity and context help |
1. Generic labels: Speaker 1, Speaker 2
Generic labels are the safest starting point when the speakers are not known. They are especially common in automated transcripts because the system can distinguish voices without necessarily knowing who owns each voice.
Speaker 1: I sent the updated file this morning. |
The advantage is neutrality. The transcript does not guess a name or role it cannot verify. The limitation is that Speaker 1 and Speaker 2 become harder to remember in long conversations with many participants.
2. Role-based labels: Agent, Customer, Host, Guest
Role-based labels work well when the relationship between speakers is more useful than their identity.
Agent: Could you confirm the email address on the account? |
A support manager reviewing hundreds of calls may care about what the agent said versus what the customer said. The employee's name can be secondary. A podcast reader may similarly care about the Host and Guest distinction even before learning each person's name. In AI phone automation, role-based labels can also help reviewers distinguish a caller’s turns from an AI agent’s replies.

3. Name-based labels: Priya, Omar, Elena
Names are usually the easiest labels for a human reader because they remove the mental translation step. You do not have to remember that Speaker 3 is Priya every time the conversation returns to her.
Priya: Should we move the launch to Thursday? |
Use names when the identities are known and it is appropriate to include them. If the transcript is anonymized, confidential, or being reviewed before identification, generic labels may still be better.
4. Name and role together
Long interviews, hearings, research sessions, and panel discussions sometimes benefit from combining identity and role.
Maya (Interviewer): When did you first notice the issue? |
This is more descriptive, but it is also visually heavier. If every line starts with a long label, the transcript can feel crowded. Use the extra context only when the reader actually needs it.
How do you choose the right format?
Start with the reader. A speaker label is useful only if it helps the person using the transcript move through the conversation with less effort.
If the identities are unknown, use neutral labels such as Speaker 1 and Speaker 2.
If the roles are stable and meaningful, use labels such as Agent and Customer or Host and Guest.
If the identities are known and appropriate to show, use names.
If both identity and role matter, combine them, but keep the label short.
If the transcript must protect identity, use consistent pseudonyms or neutral labels instead of names.
The key is consistency. Once Speaker 1 has been assigned to one voice, Speaker 1 should keep referring to that voice throughout the transcript.
The same conversation can use different labels
Label format changes the way a transcript is used, even when the spoken words stay the same.
First-pass transcription | Published interview |
Speaker 1: How did the project start? | Interviewer: How did the project start? |
The first version is useful before anyone has identified the voices. The second is better for a reader who needs to understand the final interview. Neither changes the audio. The labels change the context.
Speaker label examples by use case
Different conversations create different labeling problems. Here are a few common patterns.
Use case | Useful labels | Why it works |
|---|---|---|
Podcast | Host / Guest | Simple when there is one host and one guest. Use names if the episode has several guests or recurring hosts. |
Customer support | Agent / Customer | Makes QA review fast because each side of the interaction is immediately visible. |
Team meeting | Names | Usually easiest when participants are known and the transcript is shared internally. |
Interview | Interviewer / Interviewee or names | Role labels are clear for one-to-one interviews. Names scale better with panels or multiple interviewers. |
Focus group | Moderator / Participant 1 / Participant 2 | Useful when participant privacy matters and names should not appear. |
Multi-speaker recording | Speaker 1 / Speaker 2 / Speaker 3 | A practical first pass when identities have not yet been confirmed. |
The mistakes that make speaker labels unreliable
Most speaker-label problems are not formatting problems. They are consistency problems. A transcript can use a perfectly reasonable label format and still become difficult to trust if those labels drift.
Mistake 1: Changing the label for the same person
Confusing version
Speaker 1: I can join at three. |
If Alex and Speaker 1 are the same person, the transcript makes one speaker look like two. Pick one label and keep it throughout the file.
Mistake 2: Swapping speakers halfway through
This is more serious. If Speaker 1 and Speaker 2 are reversed after a certain point, the words are still accurate but the attribution is wrong. In interviews, research calls, compliance review, or customer support, that can change the meaning of the record.
Long recordings are especially vulnerable because similar voices, interruptions, background noise, or overlapping speech can make speaker boundaries harder to maintain.
Mistake 3: Guessing an identity from the conversation
A transcript should not turn a clue into a fact. If a speaker says, “Ask Rina to join,” that does not prove the speaker is not Rina. If identity has not been verified, a neutral label is safer than a confident guess.
Mistake 4: Using labels that are too long
Technically descriptive, visually exhausting
Senior Customer Success Manager - West Region: I can check that for you. |
Labels should provide context, not compete with the dialogue. “Agent” and “Customer” may communicate everything the reader needs.
Mistake 5: Treating overlap as a clean speaker switch
Real conversations are messy. People interrupt, laugh, say “yeah” under someone else's sentence, or start talking at the same time. Forcing every moment into neat alternating turns can hide that overlap.
The right treatment depends on the transcript's purpose. A readable meeting transcript may simplify minor overlap. A research, legal, or detailed conversational transcript may need to preserve it more explicitly.
Mistake 6: Leaving labels out when the speaker changes

A long paragraph containing several voices makes the reader reconstruct the conversation manually. Each clear speaker change should be visible in the transcript.
What does a good speaker-labeled transcript look like?
A good transcript does not make the reader think about the labels very much. That is the point. The labels should quietly provide orientation while the conversation remains the focus.
Each speaker has one stable identifier.
The same formatting is used from the beginning to the end.
Speaker changes are easy to scan.
Names and roles are used only when they are known and useful.
Uncertain identities are not presented as facts.
Overlapping or unclear speech is handled according to the transcript's purpose.
Before and after: why labels change readability

Without speaker labels | With speaker labels |
Are we still meeting tomorrow? Yes, but let's move it to ten. Ten works. I'll update the invite. | Mina: Are we still meeting tomorrow? |
The second version does not contain more conversation. It contains more structure. That structure is what makes a transcript usable.
Automated speaker labels still need context
Automatic transcription can make speaker labeling much faster, especially for long recordings. But a generic label such as Speaker 1 is not the same as a verified identity.
This creates a useful workflow: let the transcription system separate and label voices first, then add human context where it matters. A reviewer can rename Speaker 1 to Host, replace Speaker 2 with a confirmed name, or correct a section where two voices were accidentally merged.
The amount of review depends on what the transcript will be used for. A searchable internal meeting note may tolerate a few uncertain labels. A published interview, research transcript, compliance record, or customer escalation may require much closer verification.
A quick speaker-label checklist
Before you treat a transcript as finished, scan it once for the labels alone. Ignore the wording for a moment and ask:
☐ Does every speaker keep the same label throughout?
☐ Do the labels match the purpose of the transcript?
☐ Are any names or roles based on assumptions rather than verified information?
☐ Are speaker switches clearly visible?
☐ Are the labels short enough to scan quickly?
☐ Do interruptions or overlapping speech need special treatment?
Speaker labels are small, but they carry a lot of context
The words are only one layer of a conversation. A reader also needs to know who is speaking, when the speaker changes, and whether the identity attached to a line can be trusted.
That is why good speaker labeling is less about choosing between “Speaker 1” and a person's name, and more about choosing a format that matches the use case and applying it consistently.
When the labels disappear into the background and the conversation becomes effortless to follow, they are doing their job.
Want to make multi-speaker transcription easier? Explore Smallest.ai Pulse for speech-to-text with automatic speaker diarization, or start building with the API to add speaker-labeled transcripts to your applications.
Frequently asked questions
What is the purpose of speaker labels in a transcript?
Are speaker labels the same as speaker diarization?
Should a transcript use names or Speaker 1 and Speaker 2?
Can AI transcription identify speakers automatically?
How should overlapping speech be handled in a transcript?


![This blog will be featured on the top of the /blog page. Only one blog can be featured at a time. If multiple blogs are featured, only the first featured blog will appear in the list Transcribe audio to text in Python with clean preprocessing, API calls, diarization, chunking, and production retry/cost patterns you can ship confidently. Meta data of Page Empty How to Transcribe Audio to Text in Python: A Step-by-Step API Guide for Developers Transcribe audio to text in Python with clean preprocessing, API calls, diarization, chunking, and production retry/cost patterns you can ship confidently. how-to-transcribe-audio-to-text-in-python-a-step-by-step-api-guide-for-developers smallest.ai/blog/how-to-transcribe-audio-to-text-in-python-a-step-by-step-api-guide-for-developers Empty Empty Prithvi Bharadwaj Empty Transcribing audio to text sounds like a solved problem right up until you try to ship it. Different file types, odd sample rates, background noise, accents, and multi-speaker chatter have a way of turning a “quick script” into a real engineering effort. What follows is the practical path from “it works on my machine” to Python code that can handle real-world audio without reliability issues. If you’re building meeting notes, a voice-driven support bot, or an audio indexing pipeline, the same fundamentals show up again and again. You’ll end up with working Python code, a clearer sense of which knobs actually move accuracy, and a realistic map from prototype to production. The sections build in order, so you can treat this as a sequence rather than a menu. How Python Audio Transcription Works: Basic Workflow Before you start writing code, it helps to understand the full transcription flow. A speech-to-text pipeline is not just “upload audio and get text back.” In a real application, you need to prepare the audio, send the right request, receive structured output, and make that output usable for your product or workflow. Here is the basic workflow most Python audio transcription systems follow: Prepare or host the audio file Start with the audio source you want to transcribe. This could be a local file from a user upload, a call recording from your CRM, a meeting recording, a podcast episode, or a hosted file URL. If the file is already hosted securely, you can send the URL directly to the transcription API. If it is stored locally, you can upload the raw audio file from Python. Normalize audio format when needed Audio files often arrive in different formats, bitrates, sample rates, and channel layouts. Before sending them to the API, normalize the file if needed. A common safe format is mono, 16 kHz, 16-bit WAV, especially when you want predictable transcription quality across different recordings. This step helps reduce issues caused by unsupported formats, stereo channel confusion, or noisy conversions. Send the file or URL to the transcription API Once the audio is ready, your Python script sends it to the speech-to-text API. For a local file, this usually means reading the audio bytes and sending them in a POST request. For hosted audio, you send the public or signed URL in a JSON payload. In both cases, your request should include authentication, usually through an API key stored in an environment variable. Pass language, diarization, timestamp, and formatting options Most transcription APIs let you control how the output should be generated. For example, you can pass a language code such as en, enable speaker diarization for multi-speaker conversations, request word-level timestamps, or allow automatic language detection. These options are important because they affect how useful the final transcript will be for search, captions, analytics, QA, or downstream automation. Receive structured JSON A good speech-to-text API does not only return plain text. It usually returns structured JSON containing the full transcript, word-level timing, detected language, confidence scores, and speaker information when diarization is enabled. This structure is what turns a transcript from a simple text blob into data your application can work with. Extract transcript, word timestamps, speaker labels, and confidence metadata After receiving the response, parse the JSON in Python. Extract the full transcript for display, word timestamps for syncing text with audio or video, speaker labels for conversations, and confidence scores for quality checks. For example, low-confidence words can be flagged for human review before the transcript is pushed into a customer-facing or compliance-sensitive workflow. Store or post-process the transcript Finally, store the transcript and metadata in your database, object storage, CRM, QA platform, BI tool, or search index. You may also run post-processing steps such as punctuation cleanup, redaction, summarization, keyword extraction, speaker formatting, or topic tagging. This is where transcription becomes useful beyond raw text: it can power searchable call archives, meeting summaries, support QA, captions, compliance review, or voice analytics. A simple Python transcription workflow usually looks like this: 1. Prepare or host audio audio_path = "preprocessed_audio.wav" 2. Send audio to transcription API response = transcribe_audio(audio_path) 3. Extract structured fields transcript = response.get("transcription", "") words = response.get("words", []) utterances = response.get("utterances", []) language = response.get("language", "unknown") 4. Store or post-process results print("Transcript:", transcript) print("Detected language:", language) print("Word count:", len(words)) print("Speaker turns:", len(utterances)) This workflow gives you a clean mental model before you move into the actual implementation. What 'Transcribe Audio to Text' Actually Means at the API Level Before you write Python, it helps to be specific about what a speech-to-text API is doing when you hit “transcribe.” You’re not mailing a file to a black box and getting a paragraph back. The service typically runs audio through an acoustic model (sound to phonemes), a language model (phonemes to likely words in context), and then a post-processing layer that cleans things up with punctuation, capitalization, and sometimes speaker labels. Those layers are also where quality gaps show up fast. A model that looks great on clean, studio English often falls apart on call-center audio, heavy background noise, or conversations that switch languages mid-thought. That’s why API choice matters as much as your Python wrapper. If you want more of the underlying mechanics, the speech recognition Python guide breaks down how modern recognition systems behave in practice. The internal pipeline of a modern speech-to-text API, from raw audio to structured transcript Setting Up Your Python Environment Use a fresh virtual environment. Audio tooling is notorious for dependency clashes, and isolating packages saves you from debugging your machine instead of your pipeline. Run these commands to get your environment ready: python -m venv stt-env # macOS / Linux source stt-env/bin/activate # Windows stt-env\Scripts\activate pip install requests python-dotenv pydub Keep your API key in a `.env` file instead of baking it into code. That’s basic hygiene, and it also makes key rotation painless when you move from local testing to production. Add `SMALLEST_API_KEY=your_api_key_here` to `.env`, then load it with the snippet below. SMALLEST_API_KEY=your_api_key_here from dotenv import load_dotenv load_dotenv() Audio Preprocessing: The Step Most Tutorials Skip A lot of transcription walkthroughs start with a pristine WAV and pretend that’s normal. It isn’t. Phone recordings often arrive at 8 kHz, which is a bad match for models expecting 16 kHz. Video shows up as MP4 or MKV with audio tucked inside a container. Zoom exports can include separate mono tracks per speaker, which changes how you should feed the audio into a model. `pydub` covers most of the annoying format work without much fuss. Here’s a small preprocessing function that converts audio into the shape most APIs prefer: from pydub import AudioSegment def preprocess_audio(input_path: str, output_path: str) -> str: """ Convert an audio file to mono, 16 kHz, 16-bit PCM WAV. This format is commonly preferred for speech-to-text pipelines. """ audio = AudioSegment.from_file(input_path) audio = audio.set_channels(1) audio = audio.set_frame_rate(16000) audio = audio.set_sample_width(2) audio.export(output_path, format="wav") return output_path if __name__ == "__main__": preprocess_audio("input_audio.mp3", "preprocessed_audio.wav") In practice, run everything through this before you call the API. Resampling alone can move the needle a lot, especially when the original recording is telephony-grade. As Mozilla's Common Voice documentation notes, 16 kHz mono WAV is the standard input format across many open-source and commercial speech models. Preprocessing audio before sending it to a transcription API significantly improves accuracy Making Your First Transcription API Call in Python Once you’ve got a clean audio file, the API call is straightforward. The example below uses Smallest.ai's Pulse, a speech-to-text API aimed at low-latency, high-accuracy transcription, with streaming support for real-time scenarios. import os import requests from dotenv import load_dotenv load_dotenv() def transcribe_audio(file_path: str) -> dict: """ Send a local audio file to Smallest.ai Pulse STT and return the transcription response as JSON. """ api_key = os.getenv("SMALLEST_API_KEY") if not api_key: raise ValueError("Missing SMALLEST_API_KEY in environment variables.") url = "https://api.smallest.ai/waves/v1/pulse/get_text" params = { "language": "en", "word_timestamps": "true", "diarize": "false", } headers = { "Authorization": f"Bearer {api_key}", "Content-Type": "audio/wav", } with open(file_path, "rb") as audio_file: response = requests.post( url, headers=headers, params=params, data=audio_file, Two details here matter more than they look. `raise_for_status` turns HTTP failures into exceptions, so you deal with errors explicitly instead of quietly printing an empty string and calling it “done.” And word_timestamps=true gives you word-level timing, which you’ll want the moment you need to sync text to video, highlight search hits, or build any kind of usable audio index. If you’re building a richer pipeline, the speech-to-text developer guide goes further on streaming and real-time patterns. Transcribing a Hosted Audio URL import os import requests from dotenv import load_dotenv load_dotenv() def transcribe_audio_url(audio_url: str) -> dict: """ Send a hosted audio URL to Smallest.ai Pulse STT and return the transcription response as JSON. """ api_key = os.getenv("SMALLEST_API_KEY") if not api_key: raise ValueError("Missing SMALLEST_API_KEY in environment variables.") url = "https://api.smallest.ai/waves/v1/pulse/get_text" params = { "language": "en", "word_timestamps": "true", "diarize": "true", } headers = { "Authorization": f"Bearer {api_key}", "Content-Type": "application/json", } payload = { "url": audio_url, } response = requests.post( url, Handling the API Response and Extracting Structured Data A transcription response is usually more than a single transcript field. Good APIs return structure: word timings, confidence scores, detected language, and sometimes speaker metadata. Here’s a typical response shape and a simple way to pull the useful parts out: def parse_transcript(response: dict) -> None: """ Print the transcript, word-level timestamps, confidence scores, and detected language. """ full_text = response.get("transcription", "") print(f"Transcript: {full_text}") words = response.get("words", []) for word in words: text = word.get("word", "") start = word.get("start") end = word.get("end") confidence = word.get("confidence") start_text = f"{start:.2f}s" if isinstance(start, (int, float)) else "?" end_text = f"{end:.2f}s" if isinstance(end, (int, float)) else "?" confidence_text = ( f"{confidence:.2f}" if isinstance(confidence, (int, float)) else "?" ) print(f"[{start_text} - {end_text}] {text} (confidence: {confidence_text})") language = response.get("language", "unknown") print(f"Detected language: {language}") Treat confidence scores as a routing signal, not trivia. When a word drops below ~0.7, the model is telling you it’s guessing, often because of noise, an unfamiliar proper noun, or overlapping speech. In production, low-confidence spans are a good place to trigger human review instead of letting uncertainty leak into downstream systems. Anatomy of a transcription API response: transcript, word-level timestamps, and confidence scores Speaker Diarization: Knowing Who Said What Single-speaker audio is the easy mode. Meetings, podcasts, and support calls are where things get interesting, because “what was said” isn’t enough, you need “who said it.” That’s diarization, and you typically switch it on with `diarize: True` in your request parameters. When diarization is enabled, Pulse adds speaker labels to word-level and utterance-level output, so you can rebuild the transcript as a conversation. def format_diarized_transcript(response: dict) -> str: """ Format diarized utterances into a readable speaker-by-speaker transcript. """ utterances = response.get("utterances", []) lines = [] for utterance in utterances: speaker = utterance.get("speaker", "unknown_speaker") text = utterance.get("text", "").strip() start = utterance.get("start", 0) if not text: continue lines.append(f"[{start:.1f}s] {speaker}: {text}") return "\n".join(lines) There’s a catch: diarization gets worse when people talk over each other. In call-center audio, interruptions are common, and the cleanest fix is often upstream (separate channels when you have them, then transcribe) rather than expecting the model to untangle cross-talk perfectly. The speaker diarization pipelines guide goes deeper on multi-speaker strategies. Handling Long Audio Files and Chunking Strategies Transcription APIs usually impose limits on file size or duration. Even if yours doesn’t, pushing a 90-minute recording through a single request is asking for trouble: one timeout and you’re back at zero. Chunking long audio into smaller pieces is the standard way to keep the pipeline resilient. A robust chunking strategy for long audio files: Split audio into segments of 30-60 seconds using `pydub`'s `make_chunks` method Add a 1-2 second overlap between chunks to avoid cutting words at boundaries Transcribe each chunk independently and collect results in order Merge transcripts by removing duplicate words in the overlap region using a simple string alignment check Preserve global timestamps by offsetting each chunk's word timestamps by its start position in the original file from pydub import AudioSegment def split_audio_with_overlap( input_path: str, output_dir: str, chunk_length_ms: int = 60_000, overlap_ms: int = 2_000, ) -> list[str]: """ Split long audio into overlapping chunks. Default: 60-second chunks with 2-second overlap. """ audio = AudioSegment.from_file(input_path) chunk_paths = [] start = 0 chunk_index = 0 while start < len(audio): end = min(start + chunk_length_ms, len(audio)) chunk = audio[start:end] chunk_path = f"{output_dir}/chunk_{chunk_index:04d}.wav" chunk.export(chunk_path, format="wav") chunk_paths.append(chunk_path) if end == len(audio): break start = end - overlap_ms chunk_index += 1 return chunk_paths That overlap is the difference between “mostly works” and a system that behaves predictably at boundaries. Without it, words that land on the boundary get clipped and either vanish or come back mangled. A one-second overlap barely changes processing cost, but it wipes out an entire category of edge cases. If you’re dealing with accents, code-switching, or multilingual audio, the speech-to-text for multilingual audio guide lays out the extra pitfalls. Chunking long audio with overlapping segments prevents word-boundary errors at split points Production Considerations: Error Handling, Retries, and Cost Control A laptop script is a demo; production is where the messy stuff shows up. Rate limits kick in, networks flake out, and users upload audio in formats you didn’t plan for (or recordings that are far longer than they should be). If you plan for those three upfront, the rest is mostly engineering. For rate limits and transient failures, use exponential backoff. `tenacity` keeps it tidy: `@retry(wait=wait_exponential(multiplier=1, min=2, max=30), stop=stop_after_attempt(5))`. Put that decorator on your API call and you’ll ride out most short-lived issues without writing your own retry state machine. pip install tenacity import os import requests from dotenv import load_dotenv from tenacity import retry, stop_after_attempt, wait_exponential load_dotenv() @retry( wait=wait_exponential(multiplier=1, min=2, max=30), stop=stop_after_attempt(5), ) def transcribe_with_retries(file_path: str) -> dict: """ Transcribe audio with retries for transient API or network failures. """ api_key = os.getenv("SMALLEST_API_KEY") if not api_key: raise ValueError("Missing SMALLEST_API_KEY in environment variables.") url = "https://api.smallest.ai/waves/v1/pulse/get_text" params = { "language": "en", "word_timestamps": "true", "diarize": "false", } headers = { "Authorization": f"Bearer {api_key}", "Content-Type": "audio/wav", } with open(file_path, "rb") as audio_file: Cost is the other production surprise. Most transcription APIs bill per minute, which means “just run it” can get expensive fast. Two habits keep spend predictable: check duration before you upload (and reject anything over your cap at the app layer), and cache results so the same file doesn’t get transcribed twice. A content hash of the audio makes a practical cache key. If you’re building at volume, the speech-to-text guide gets into higher-throughput architectures, async workers, queues, and the patterns that keep long-running pipelines stable. What Most Developers Get Wrong About Transcription Accuracy A 5% WER sounds tiny until you translate it: roughly 1 in every 20 words is wrong. In a 500-word meeting summary, that's about 25 errors. Even state-of-the-art models show meaningfully higher word error rates on noisy, spontaneous conversational speech compared to clean benchmark conditions (sometimes exceeding 20%) which is why testing on your own audio is non-negotiable. So benchmark like you mean it. Test your API on audio that matches your product, not on clean demo clips. Capture 10–15 minutes from the real environment, measure accuracy, and only then commit. Domain vocabulary is where general models stumble most, medical terms, product names, internal acronyms. If your provider offers custom vocabulary or domain adaptation, use it when specialized terminology is part of the job. Summary and Next Steps A dependable audio-to-text pipeline in Python usually comes down to four disciplines: normalize audio before the API sees it, treat the response as structured data (not a single string), chunk long recordings with overlap, and build retries and error handling as first-class features. The snippets here stay intentionally small so you can drop them into your own stack without a rewrite. As usage grows, you’ll likely add async processing, a job queue, and durable storage for results, but the core flow doesn’t change. If you’re comparing speech-to-text providers, Smallest.ai's Pulse is built for developers who care about latency, transcription quality, and an API that integrates cleanly. It supports streaming transcription, speaker diarization, word-level timestamps, and multilingual audio out of the box, which lines up with the production patterns covered above. Explore Pulse and the Waves API to start transcribing audio in Python today. The four pillars of a production-ready transcription pipeline in Python Gushwork Team: Ignore this Build Audio Transcription in Python Start testing speech-to-text workflows today Start Building https://app.smallest.ai/ FAQ row will only show if FAQ Answer is set. Please make sure both Question and Answers are set. The visibility of the FAQ Section is tied to FAQ Question 1 being set.](https://framerusercontent.com/images/5h0IzsaRLohS5uAxf7C2xhgJnOI.png?width=1456&height=816)